Gopher Go, made simple.
This is your step-by-step guide to earning on Gopher Go, the app for local workers. Set up once, choose the work you want, and take only the jobs that suit you. Customers pay through Gopher, and your pay goes straight to your debit card.
This is your guide to Gopher Go on the website: your account hub. You sign in with the same account you use in the app.


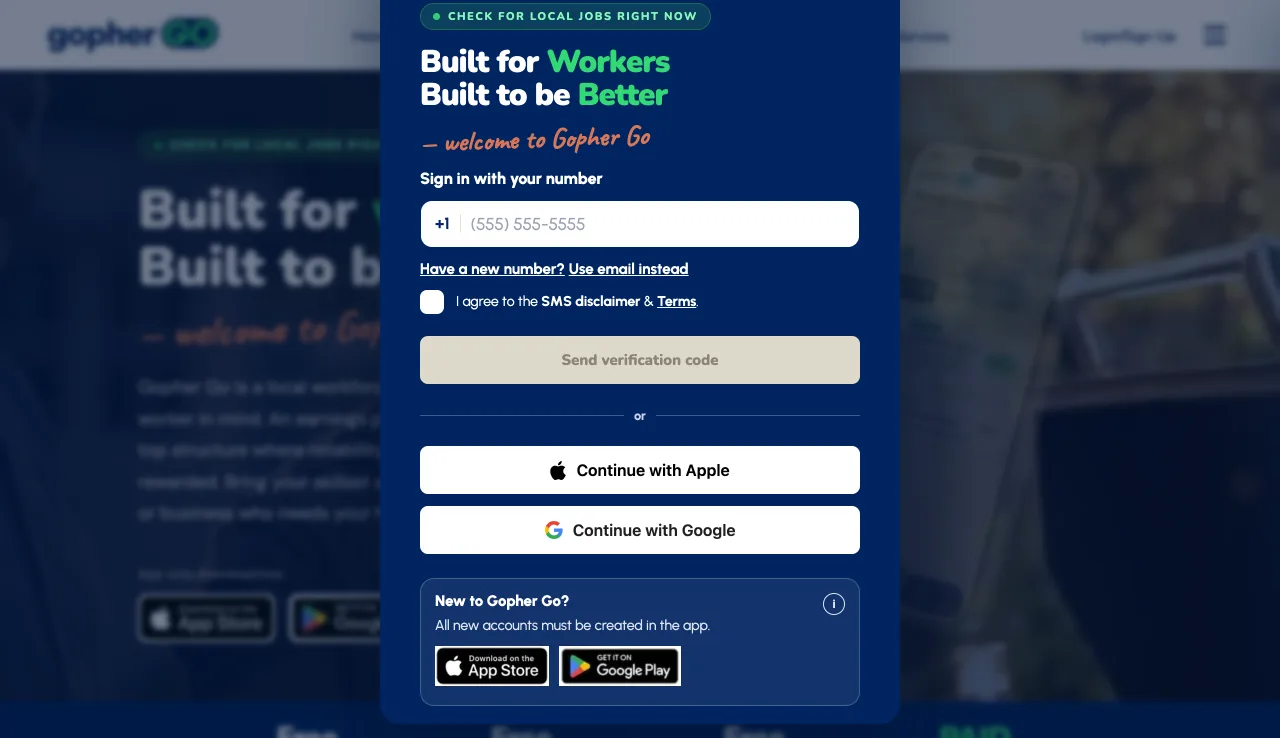
Sign in
Gopher is passwordless, so there's nothing to remember. You sign in with a 6-digit code we text to your mobile number (or email to you). New workers start on the same screen.
- Open Gopher Go. Under Sign in or sign up with your number, enter your 10-digit mobile number.
- Tick I agree to the SMS disclaimer & Terms. and tap Send verification code.
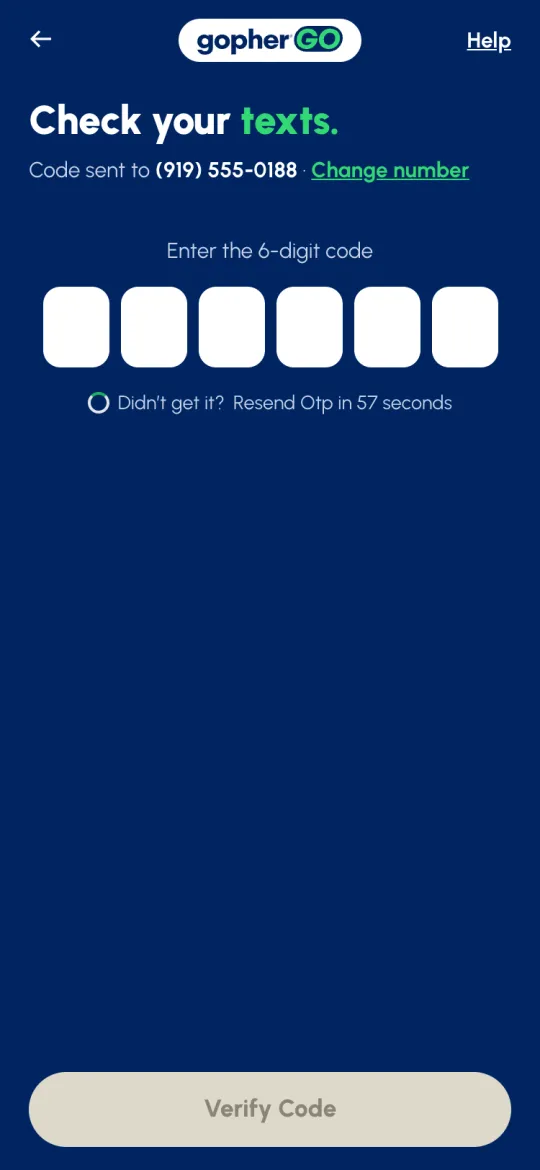
- On Check your texts., enter the 6-digit code and tap Verify Code. If you've been here before, you land on Home. If the number is new, sign-up starts (see the next section).
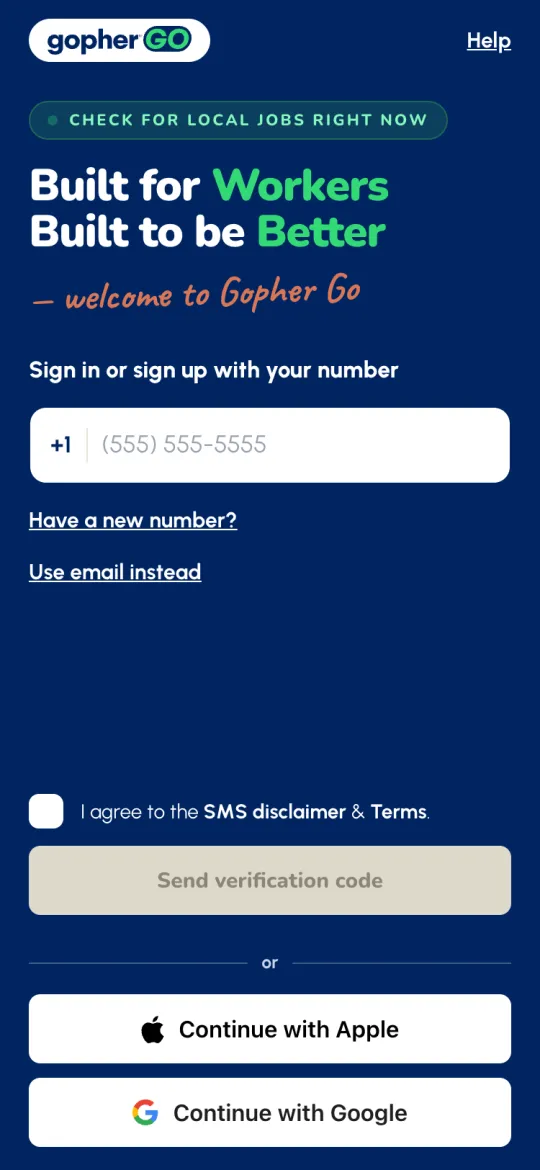
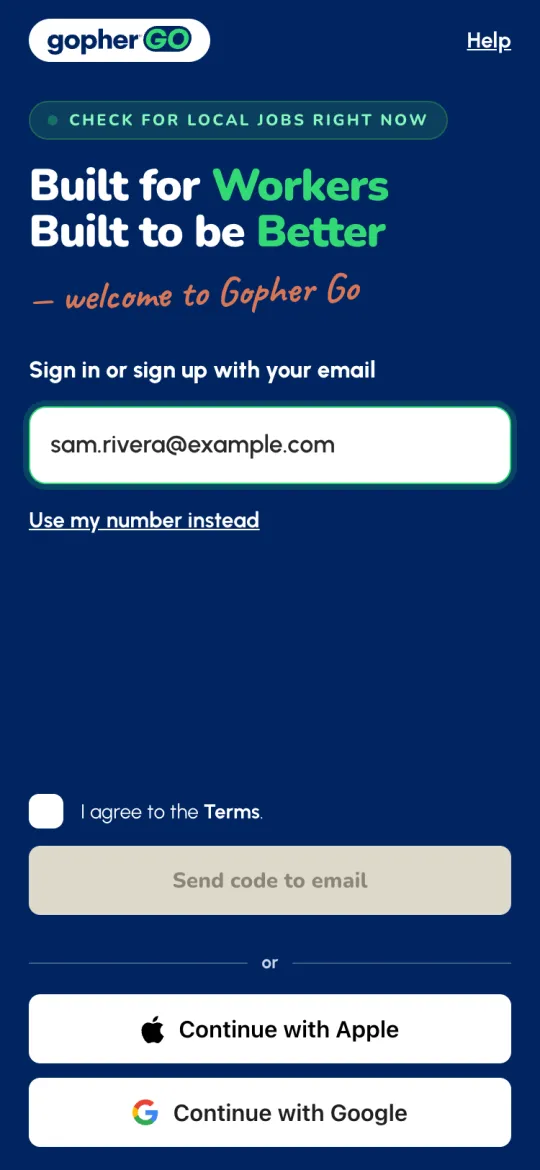
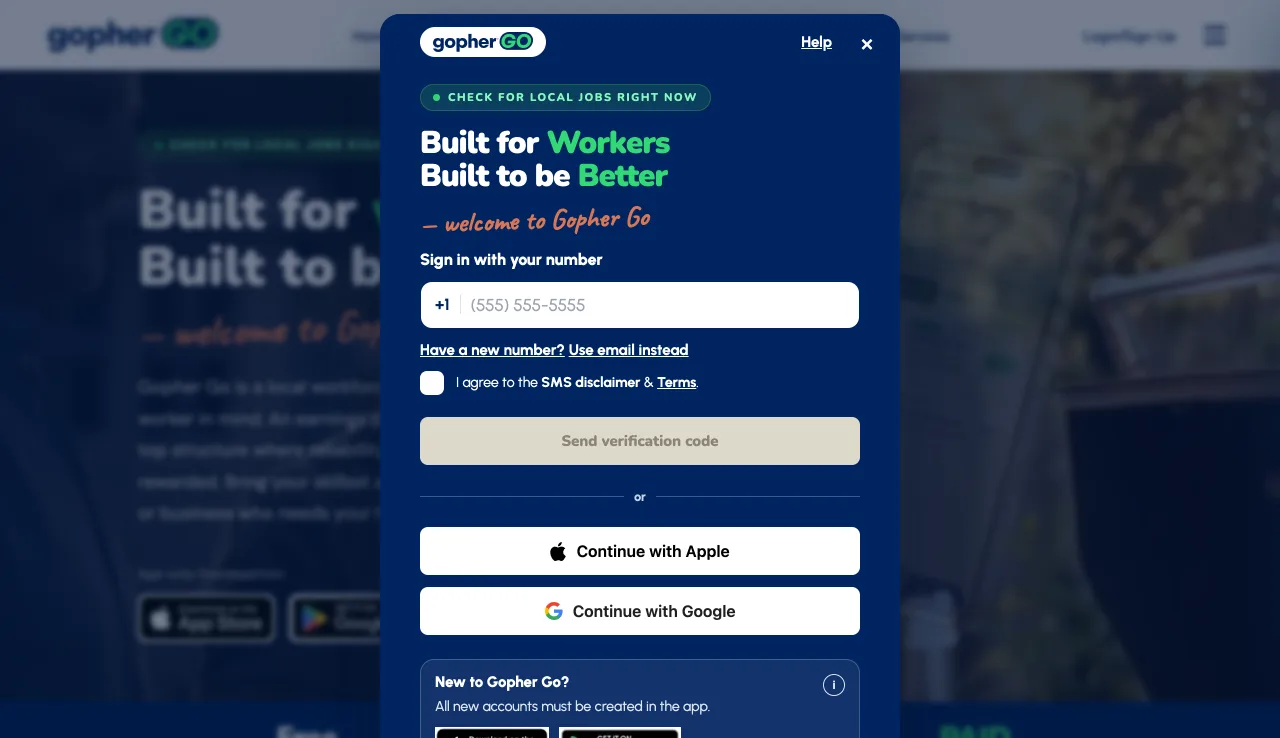
On the Gopher Go page of the website, click Login/Sign-Up at the top and choose Gopher Go. You sign in with a 6-digit code, the same way as in the app, and it's the same account.
- Under Sign in with your number, enter your 10-digit mobile number.
- Tick I agree to the SMS disclaimer & Terms. and click Send verification code.
- On Enter your code, type the 6-digit code we texted you and click Verify. Your dashboard opens.
The website keeps you signed in on that browser until you click Sign out. Signed out without clicking Sign out? Your sign-in expired: click OK on You’ve been signed out and sign in again. Got a new phone number? Click Have a new number? on the sign-in window, or just sign in: click Use email instead and enter the email on your account.
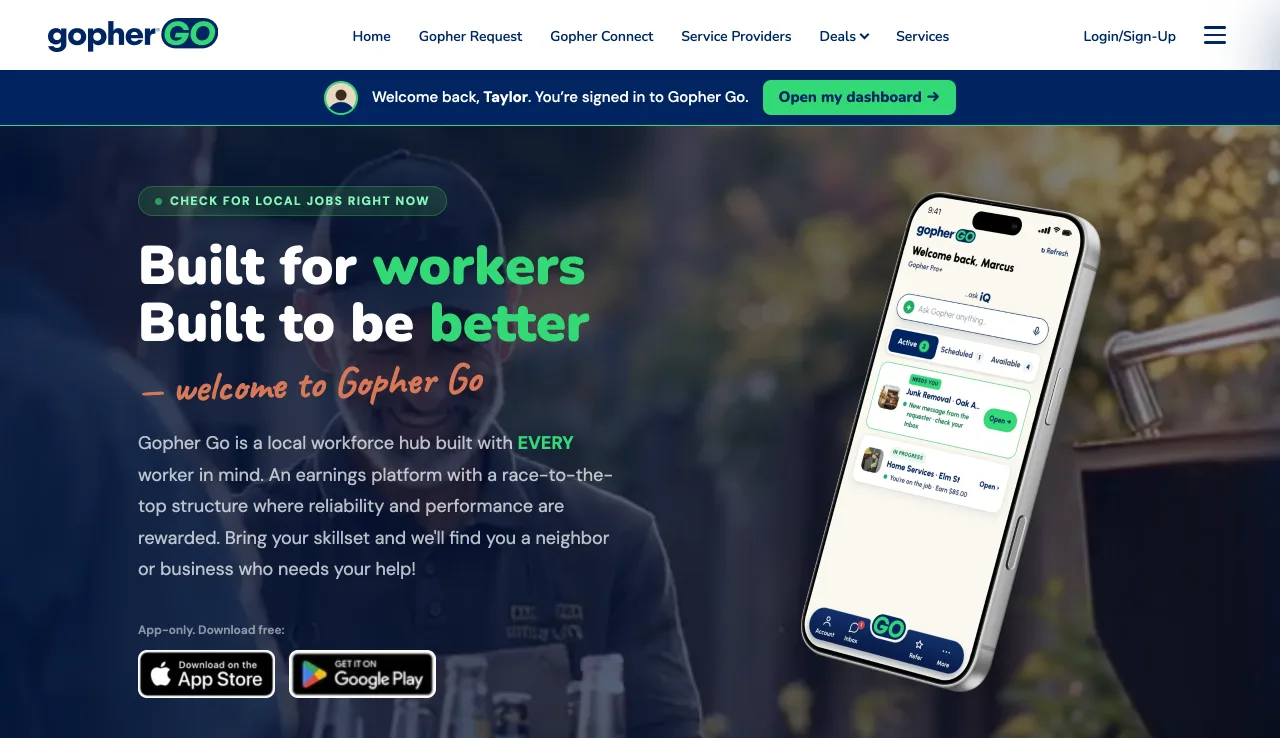
Signed in already? The Gopher Go page opens with a bar under the header: your photo (or initials), Welcome back, <your name>. You’re signed in to Gopher Go. Click Open my dashboard →. ← Back to main page in the dashboard’s side menu returns you to the Gopher Go page with the bar still there; you stay signed in. Sign out removes it.
Create your account
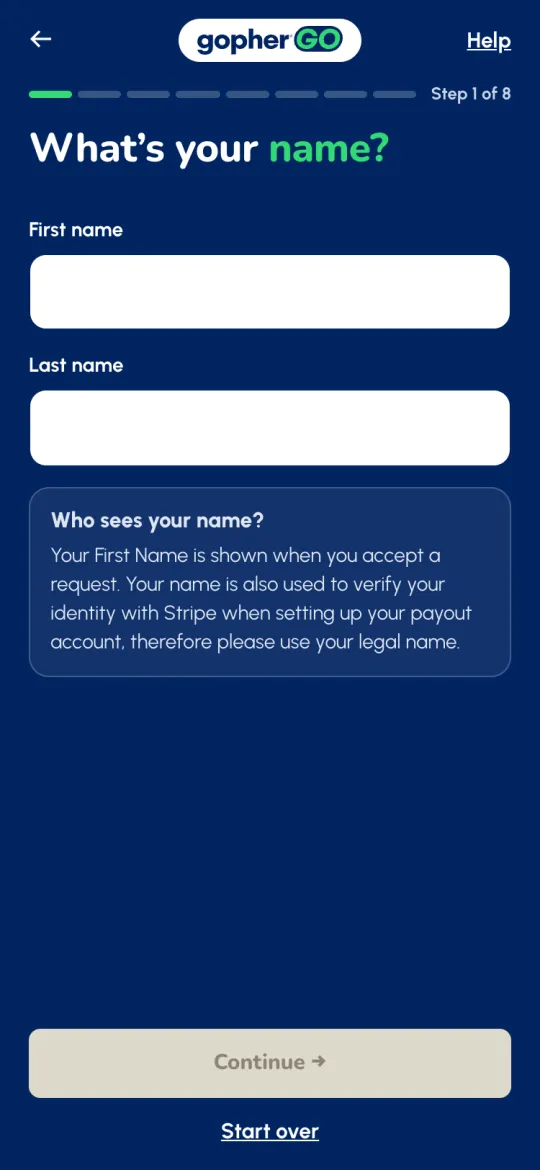
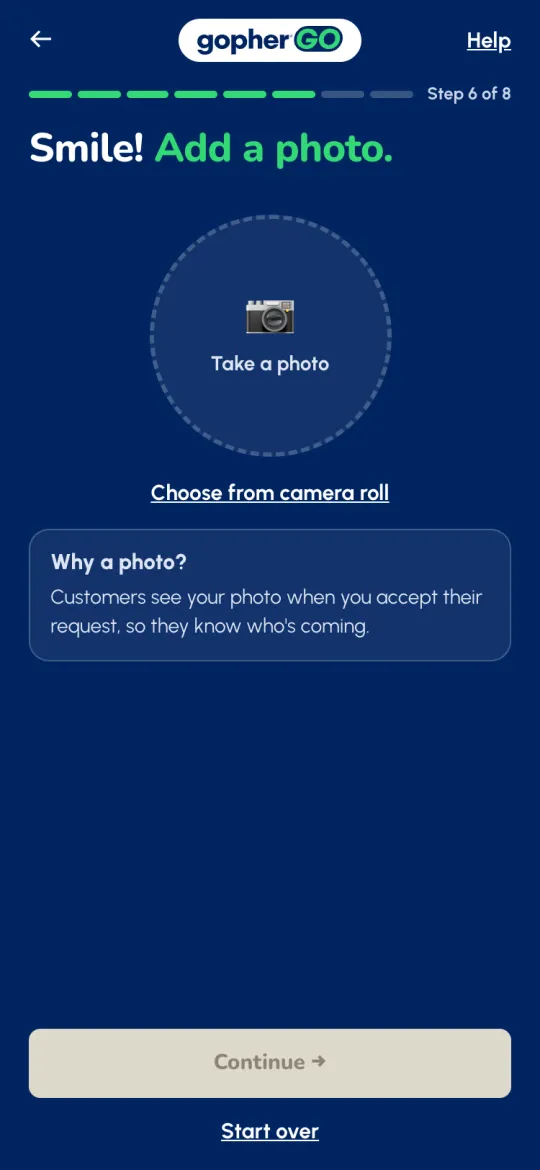
There's no separate sign-up button. A new number goes straight into a short set-up, one question per screen, counted Step 1 of 8 to Step 8 of 8:
- Your name. Use your legal name. It's also used to verify your identity with Stripe when you set up your payouts.
- Your birthday. You need to be at least 16 to join. If you're 16 or 17, a parent or guardian has to accept the Terms for you and co-sign your payout account (Terms of Service §9).
- Your email, typed twice.
- Your address. Tap Use my current location or enter it.
- How did you discover Gopher? If someone referred you, choose Referral and enter their Gopher ID in Referrer ID (optional). If you joined from someone's invite, it's filled in for you. Heard about us somewhere else? Choose Other and tell us where in Where did you hear about us? You’ll need to fill it in to continue.
- Your photo. This one is required. Customers see it when you accept their request, so they know who's coming.
- Look good? Check everything and tap Confirm account →.
- Check your email. Enter the code we email you.
Every step has Start over under the main button (Continue →). It deletes the sign-up you started on this number so you can begin again. Already have a Gopher account and just changed numbers? Delete the new one this way, then tap Have a new number? on the sign-in screen.
All new Gopher Go accounts are created in the app. Download Gopher Go from the App Store or Google Play, set up there, then come back to the website.
If you sign in with a number, email, Apple or Google that has no Gopher Go account yet, the website says Let's get you set up and points you to the app. If your sign-up or your worker set-up isn't finished, it tells you Your Gopher Go sign-up isn't finished yet: open the app to finish it, then sign in here again.
Set up to work
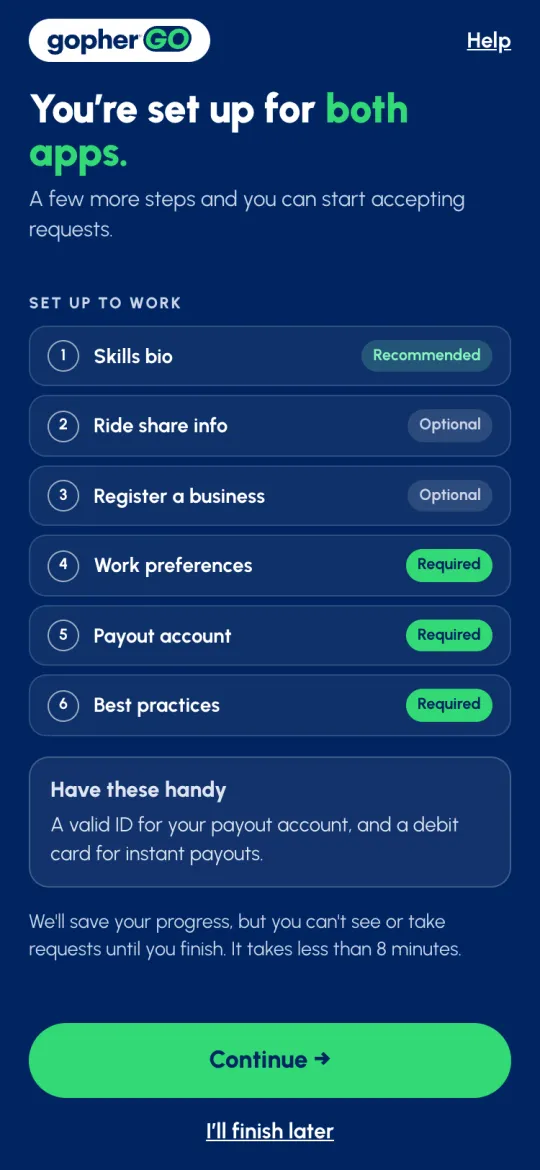
One Gopher account works in both apps, so the next screen says You're set up for both apps. Before you can see or take requests in Gopher Go, there are six more steps, counted Set up to work · 1 of 6 to 6 of 6:
- Skills Bio Recommended. What you do, your years of experience and the tools you bring. A preview shows how customers see you.
- Ride Share Info Optional. Only if you want to give rides: your car and driver details, plus your insurance carrier and policy number. Rides stay locked in your work choices until this is done.
- Register a Business Optional. If you work as a business: your business name, logo and details.
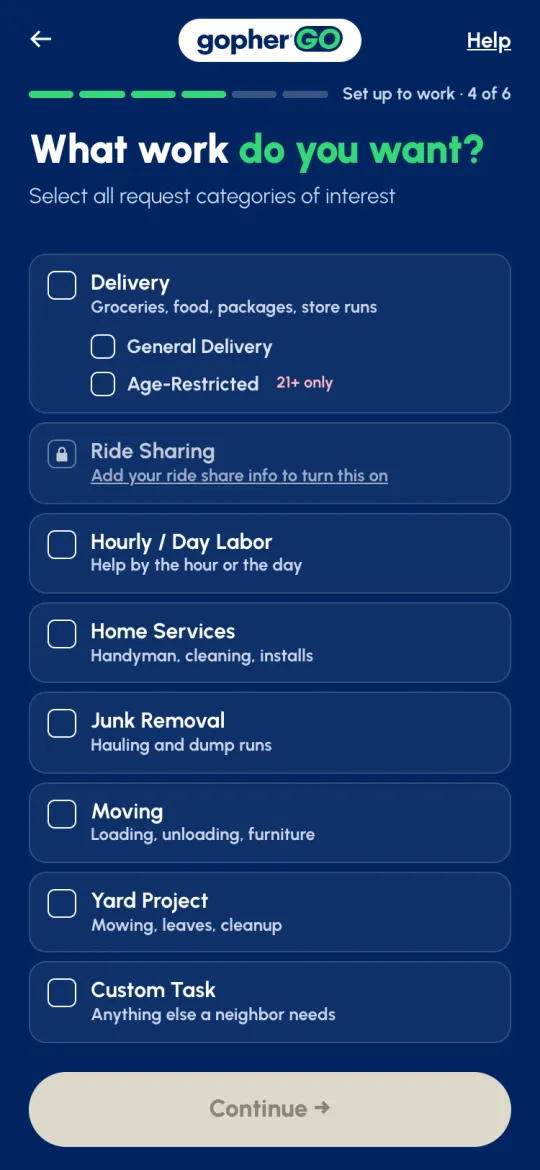
- Work Preferences Required. The kinds of work you want (see Work settings & radius).
- Payout Account Required. Your details for Stripe, then your debit card (see Payout account).
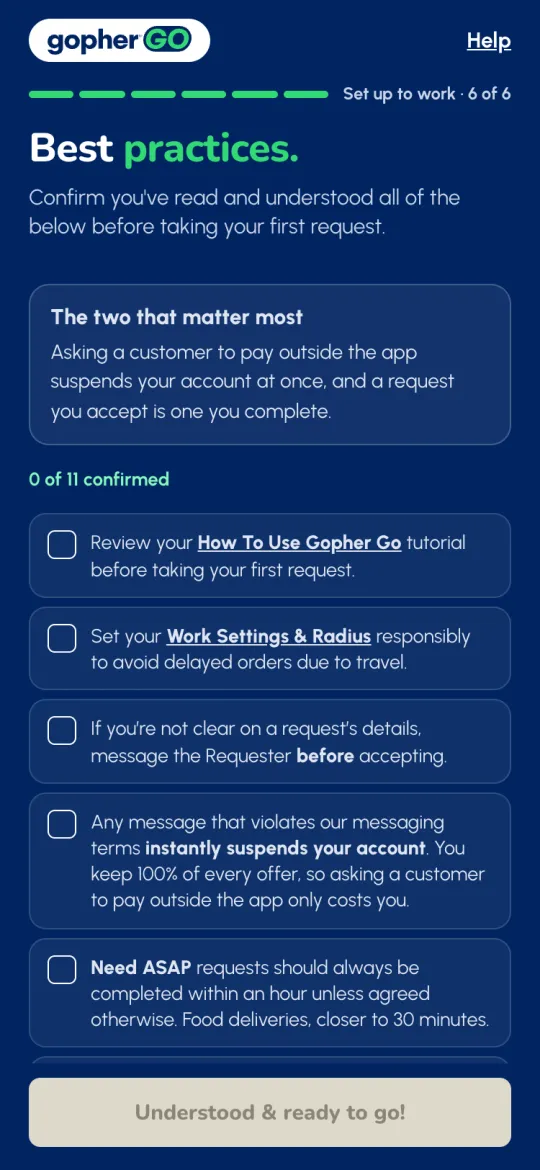
- Best Practices Required. Eleven short rules. Tick each one, then tap Understood & ready to go!.
Last, Almost ready to work! asks you to turn on location. Gopher Go uses it to find requests near you, even when the app is closed. If your phone’s location is turned off, Gopher Go opens to Location is off. Tap Open Settings →, turn location on and come back: the app carries on by itself.
Find your way around
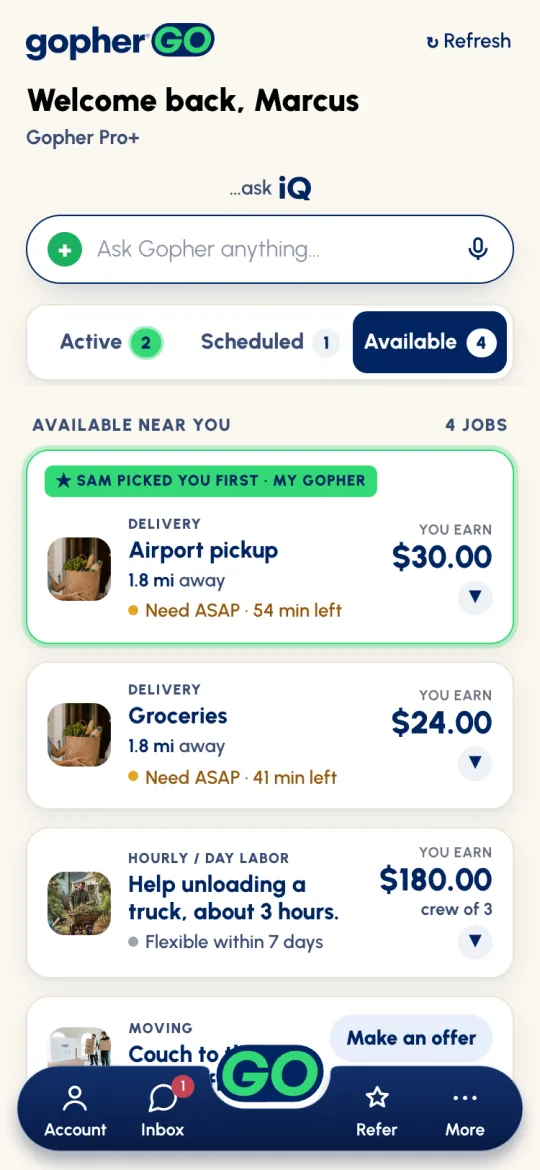
The app has five tabs on a floating bar at the bottom of the screen: Account · Inbox · GO · Refer · More. The big green GO in the middle takes you to Home, or straight back to a job you're working on. A red number on Inbox means unread messages; on Account, it means your payout card needs attention.
Home, top to bottom
- ↻ Refresh at the top right. Home also refreshes itself every few seconds.
- Welcome back, with Gopher Pro or Gopher Pro+ under your name if you have a tier (see Gopher Pro & Pro+).
- …ask iQ: tap Ask Gopher anything… for quick answers about the app. If Gopher has a survey open for you, its card takes this spot instead (see below).
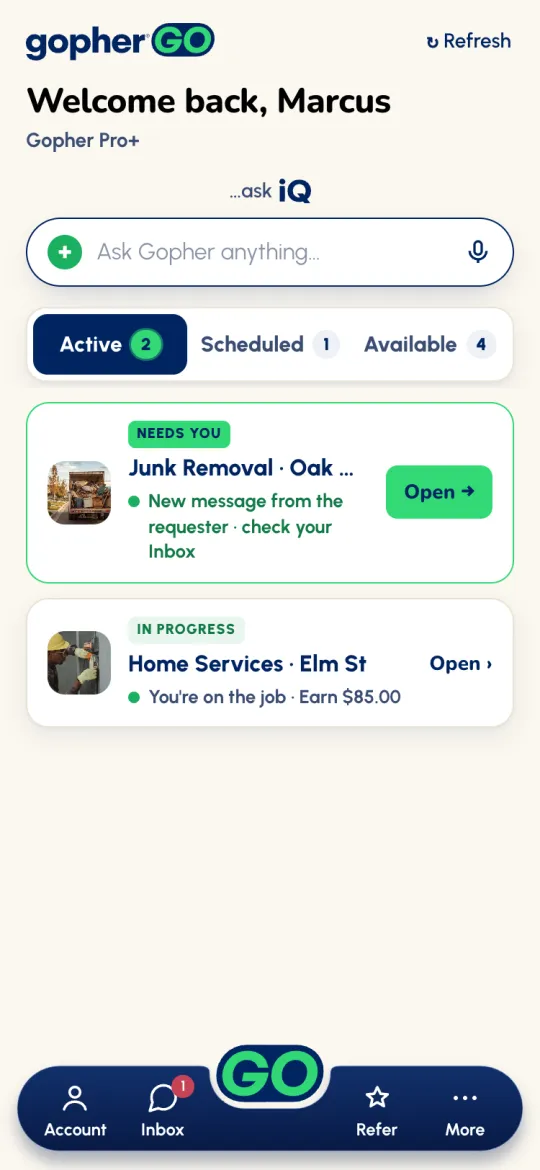
- Three tabs, each with a count: Active (jobs you're working on), Scheduled (jobs you've accepted for later) and Available (jobs you can take, under Available near you).
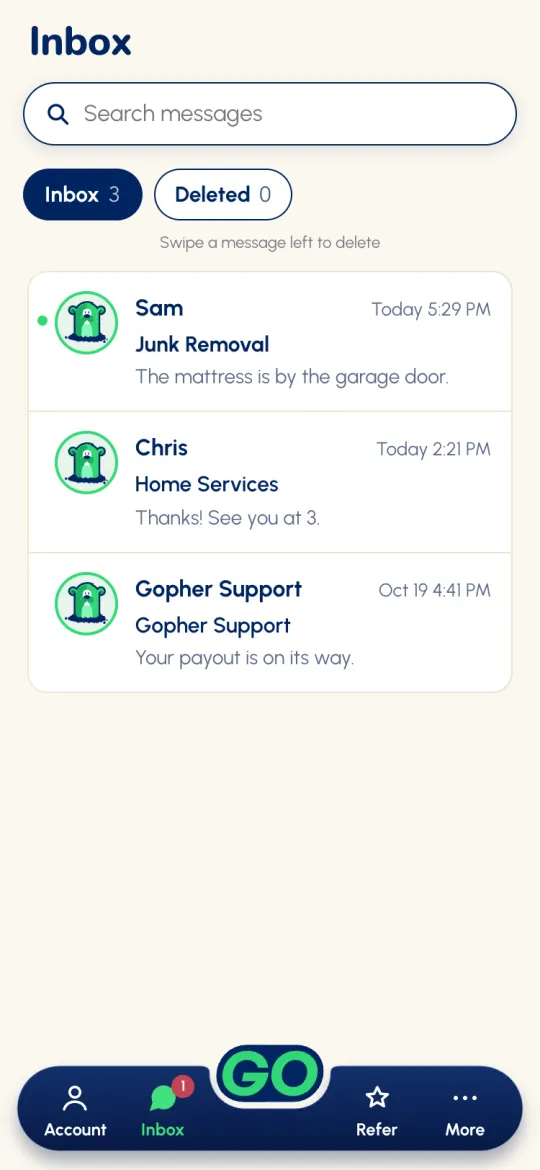
In Inbox, swipe a message left to delete it. Deleted messages clear themselves after 90 days. If a photo you send in a chat doesn’t go through, it stays in your message box with the note Your photo didn’t send. Check your connection, then tap Send to try again. Tap Send to try again.
Replying to us: some Gopher Support messages take a reply. Type in Message and tap the arrow (up to 1,000 characters). To add a photo, tap the camera next to the box, then Take a photo or Choose from library. We’ll notify you when we answer. Messages from Gopher HQ can’t be replied to.
A quick survey when Gopher grows near you
Before Gopher launches in your area, or grows there, you may get a short survey. A navy card sits above the tabs on Home, on every tab, saying Gopher is coming to your city (or Gopher is growing in it), with a 4 quick taps button. The same survey can also arrive as a notification. If you haven't answered, an email follows after 3 days and a text after 7. You can unsubscribe from the email, or reply STOP to the text.
- The questions: the lowest offer you'd take for a delivery under 5 miles, the days you can work (and the times, if you like), whether you'd deliver age-restricted items (21+, ID check at the door), and one question about where you are with Gopher Go, such as what's kept you from finishing setup. Send works once everything but the times is answered.
- After you send it, your answers are listed and one button takes you on: Finish setting up opens your payout account if you haven't finished setting up; otherwise Turn on job alerts opens Work Settings & Radius. The card then leaves Home and the …ask iQ bar comes back. If you don't answer, the card stays until Gopher closes the survey.
- It's up to you and changes nothing about how you work: you only work when you want, and you're never penalized for passing on jobs.
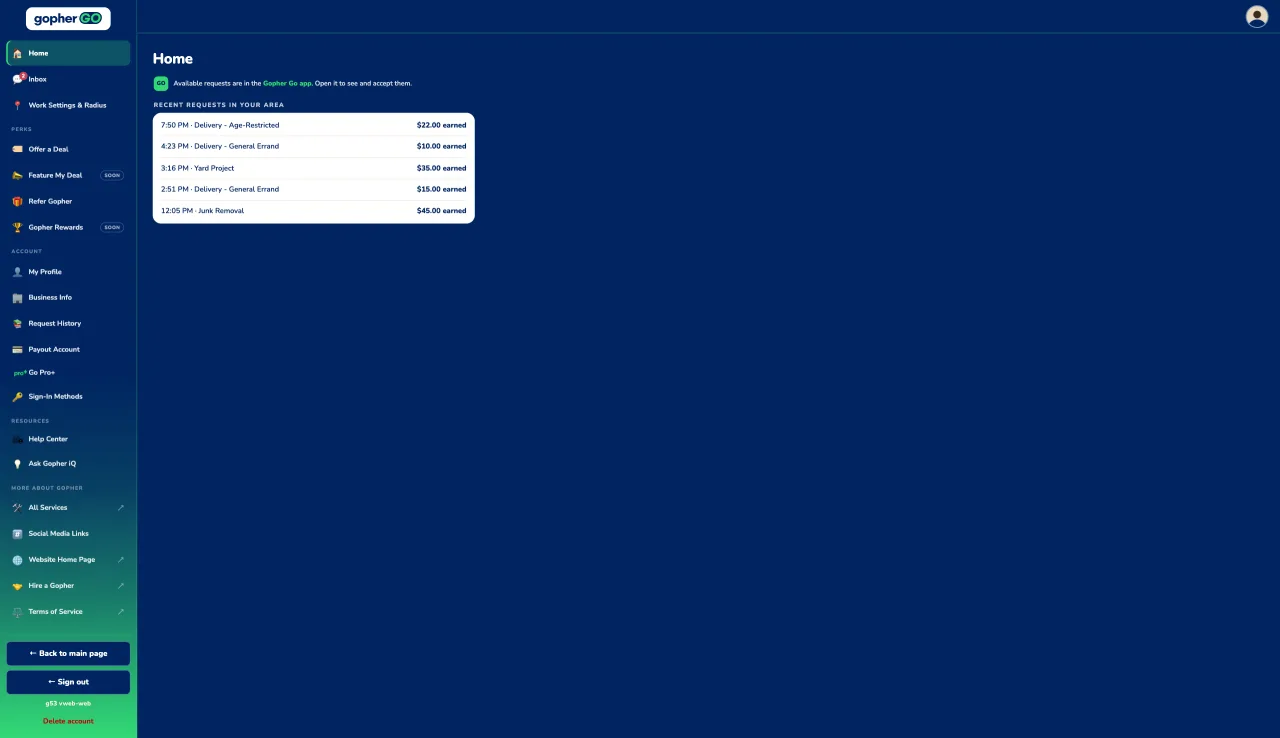
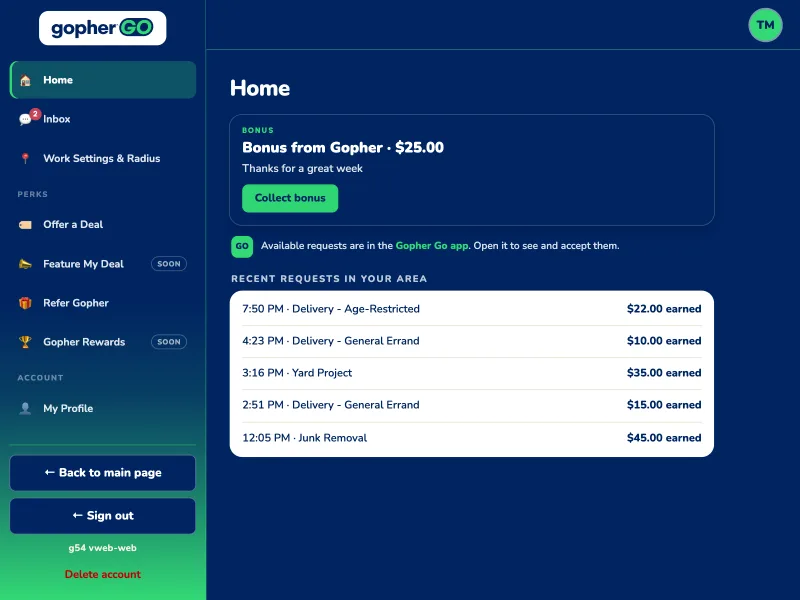
On the website, your dashboard has a menu down the left. Your profile picture is at the top right (My Profile shows the rest), and the name of the page you’re on sits at the top of the page.
- At the top: Home, Inbox and Work Settings & Radius. A red number on the Inbox icon is your unread messages.
- Perks: Offer a Deal (see Service Provider Deal), Feature My Deal, Refer Gopher and Gopher Rewards.
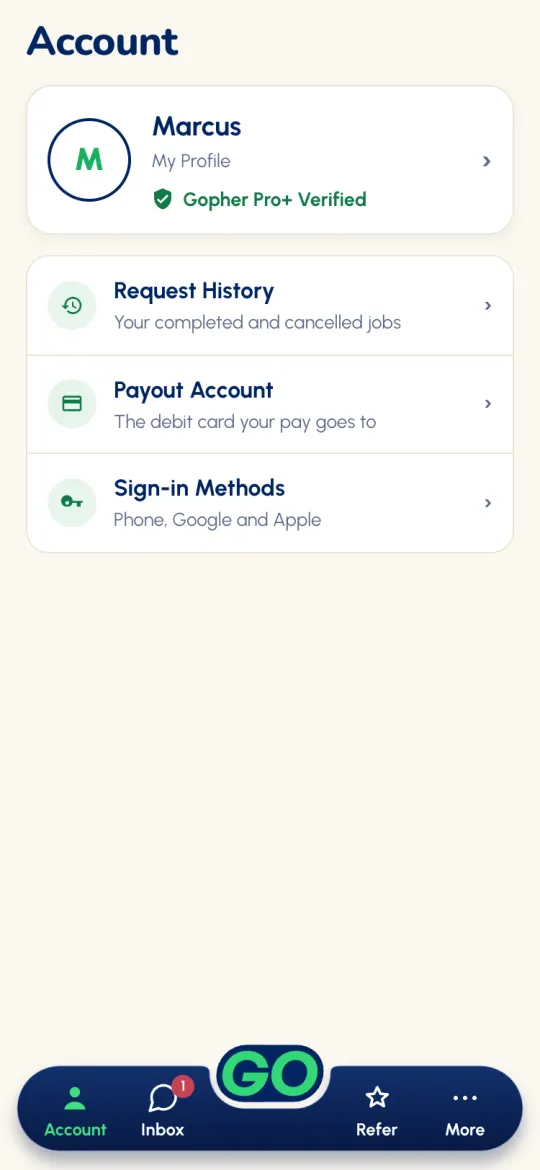
- Account: My Profile, Business Info, Request History and Payout Account, then Go Pro+ (see Gopher Pro & Pro+) and Sign-In Methods. If you’re a Gopher Pro+, there’s no Go Pro+ row: Gopher Pro+ Verified shows under My Profile, with a green shield.
- Resources: Help Center and Ask Gopher iQ.
- More About Gopher: All Services, Social Media Links, Website Home Page, Hire a Gopher and Terms of Service. Social Media Links shows Gopher's accounts (Facebook, Instagram, LinkedIn, Nextdoor, Reddit, TikTok, X and YouTube); click one to open it in a new tab. The other rows open the page in a new tab, so your dashboard stays open.
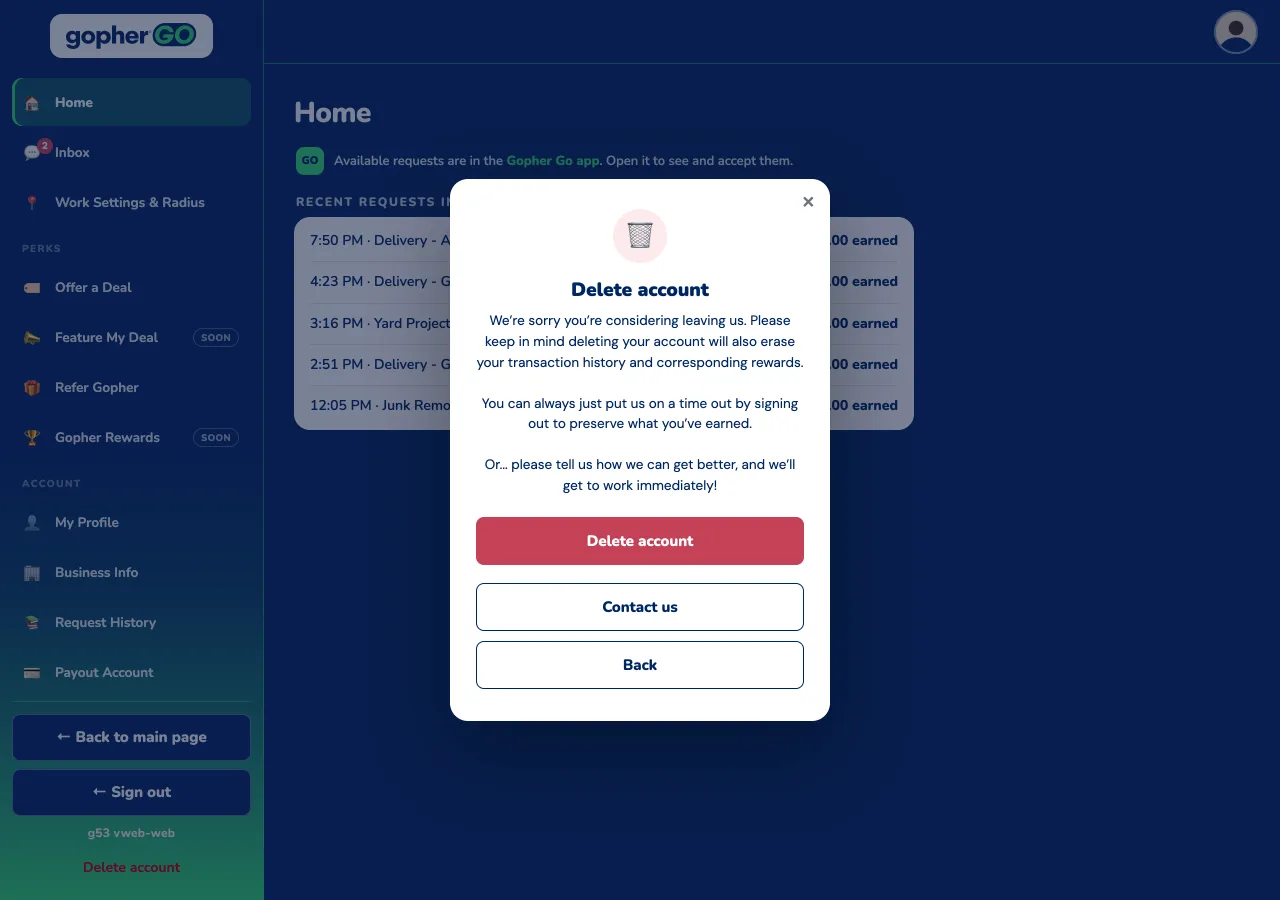
- At the bottom: ← Back to main page and ← Sign out. The faint line under them is the version, handy if you ever contact support, and the red Delete account link is below it.
An item marked Soon isn't open yet; click it and it tells you why. On a narrower screen, the menu folds into the ☰ button at the top left.
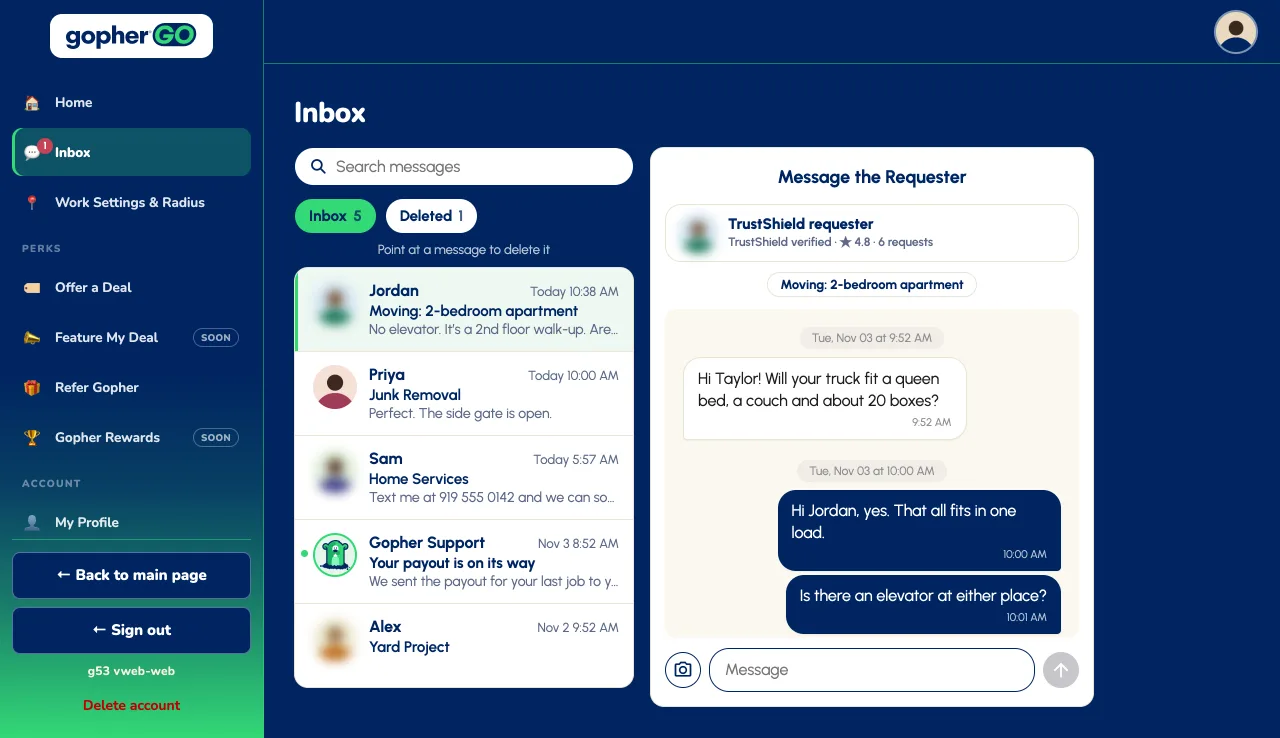
Inbox
Inbox in the menu shows your messages from customers and Gopher Support.
- Your messages: they're listed on the left, with Search messages and the Inbox and Deleted tabs. Click one to read the whole chat on the right.
- Sending: type in Message and click the arrow. The camera button picks a photo from your computer, under 10 MB. Photos open once the customer hires you.
- Deleting: point at a message to delete it. Deleted messages clear themselves after 90 days.
- Replying to us: some Gopher Support messages take a reply. Type in Message and click the arrow (up to 1,000 characters). To add a photo, click the camera next to the box and pick one from your computer. Messages from Gopher HQ can’t be replied to.
Your profile
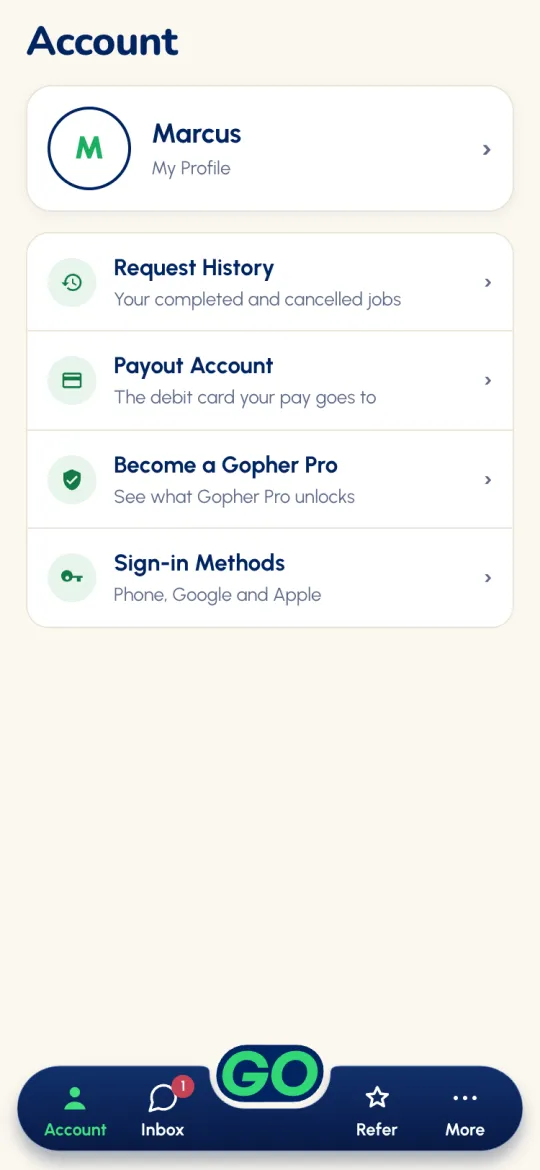
Tap Account for your profile card, Request History and Payout Account. Sign-in Methods shows how you sign in: your phone (always on) plus any Apple or Google you've linked, each with Remove. If you don't have a tier yet, there's also Become a Gopher Pro.
My Profile
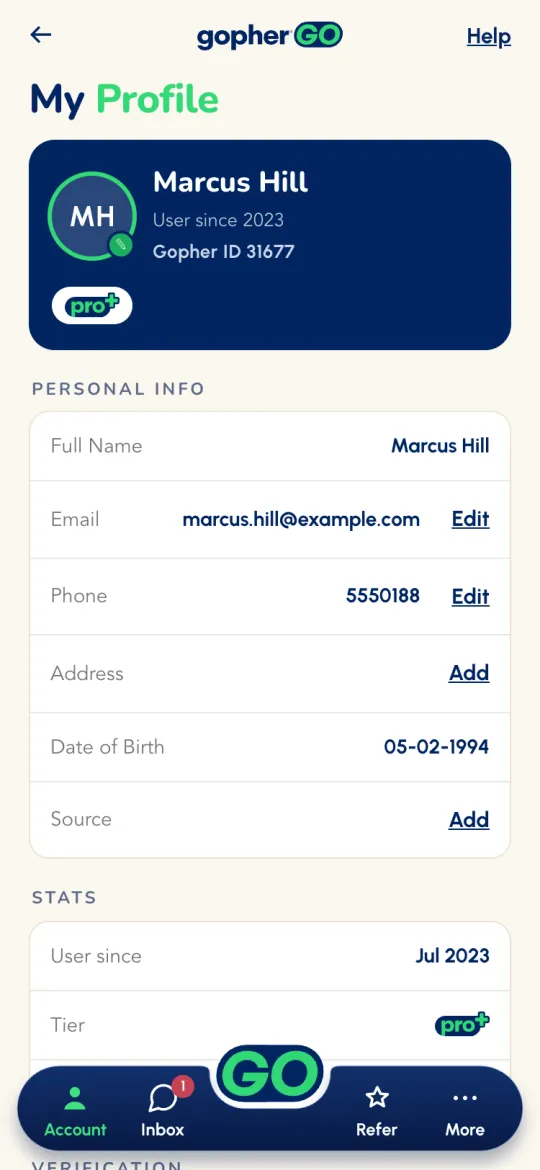
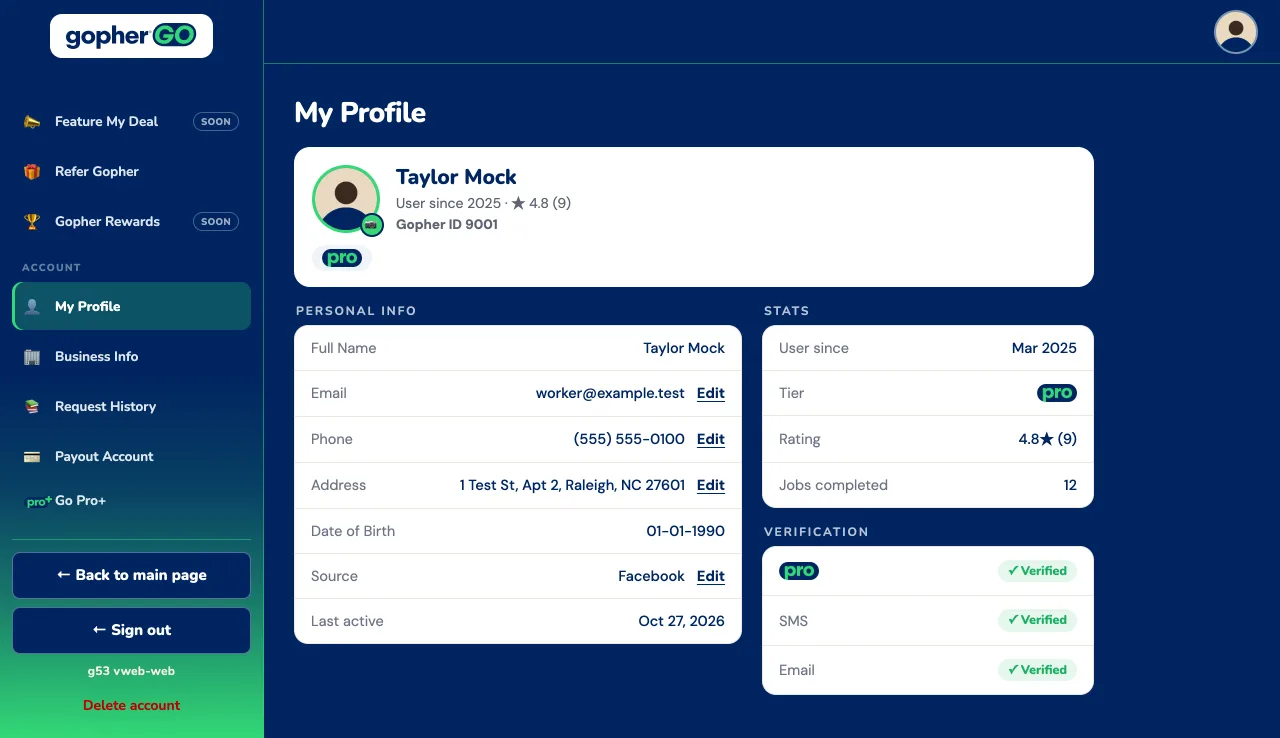
Tap your profile card to open My Profile. It shows your Gopher ID (the number someone you refer enters at sign-up), your personal info, your stats, and your verification status, including whether Stripe pays you at standard or instant speed. Tap your photo to change it. Email, Phone, Address and Source each have an Edit (or Add) link.
Every Edit opens the same Personal Info sheet. Your name and date of birth are locked. If you change your email, we send a code to the new address, and your email only changes once you enter the right code. Tap Phone to start Change your phone number?: we verify who you are, then you sign back in with the new number. You can also write About you (up to 150 characters). Tap Save changes when you're done. Ride sharing and Business account are their own sections on My Profile: open one and tap its Edit (or Add) to turn on Offer ride sharing and add your car and driver details, or to register your legal business with its name, logo, address, credentials and a short description.
Show me as a business, in Business account on My Profile, picks the profile requesters see while they choose a Gopher: your business (name, logo, title and About) or you (first name, photo and About). Turning it on needs a registered business with a name and an About. Your business info stays saved either way.
Home opens first when you sign in. Top to bottom:
- Your Bonus, if Gopher sent you one (see Collecting a Bonus).
- Available requests are in the Gopher Go app. Open it to see and accept them. You can’t open or accept a request on the website.
- Recent requests in your area: the same list as the app’s, with the time, the kind of job and what it earned. These are past requests only. The website asks for your location once to show it; without your location, the list isn’t shown.
My Profile shows:
- your name, Gopher ID and rating;
- your personal info;
- your stats;
- your verification.
To change it:
- Click the camera on your photo to change your photo.
- Edit next to Email, Phone, Address or Source asks one question, like What's your email?, with Save changes.
- A new email only takes effect once you enter the code we send to it and click Verify code.
- Phone opens Change your phone number?: we verify who you are, then you sign back in with the new number.
- Your name and date of birth are locked. About you is written in the app.
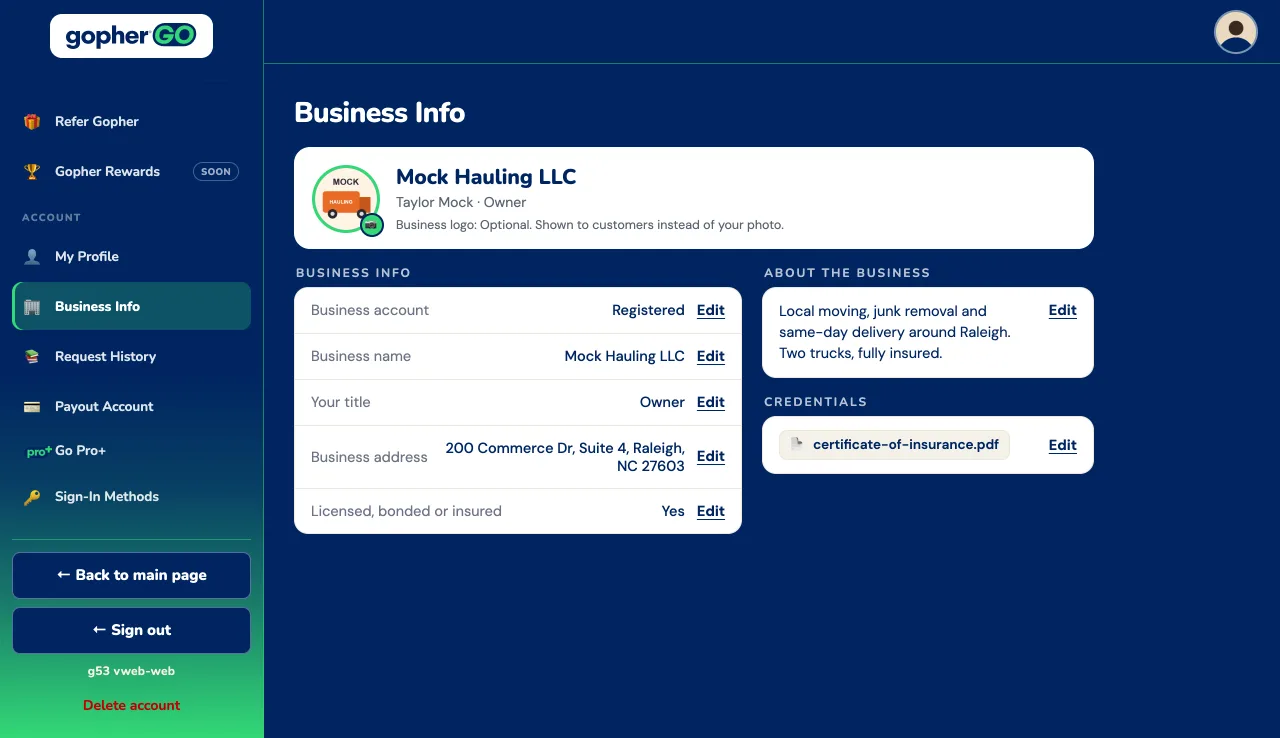
Business Info:
- The top of the page shows your logo, business name, your name and your title. Click the logo to add or change it.
- Show me as a business, just above Business account, picks the profile requesters see while they choose a Gopher: your business (name, logo, title and About) or you (first name, photo and About). Turning it on needs a registered business with a name and an About. Your business info stays saved either way.
- Business account, Business name, Your title, Business address, Licensed, bonded or insured and About the business each have an Edit.
- Not registered yet? Business account reads Not registered, with Add. It asks Do you run a registered business? (Yes, I do or Not right now). You need a profile photo first.
- Credentials: while Licensed, bonded or insured is Yes, you can upload them, a PDF or picture, up to 3.
- No logo? Turn on My business doesn't have a logo and customers see your profile picture instead.
- Turning your business off clears your business name, title, description and licensed answer.
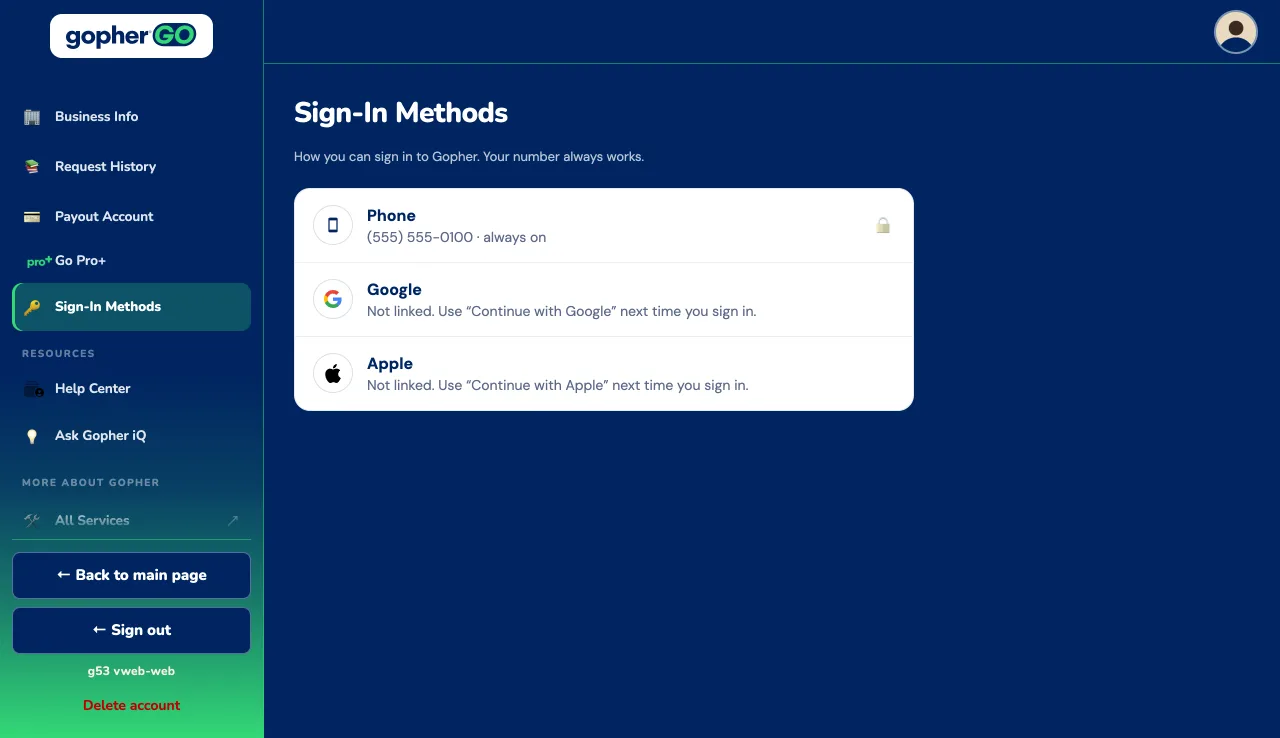
Sign-in Methods shows your phone (always on) and whether Google and Apple are linked. To link one, use Continue with Google or Continue with Apple the next time you sign in. A linked one has Remove.
Your payout account
Gopher pays you through Stripe, our payment partner, to a debit card. There are no fees to get paid. You set this up during sign-up:
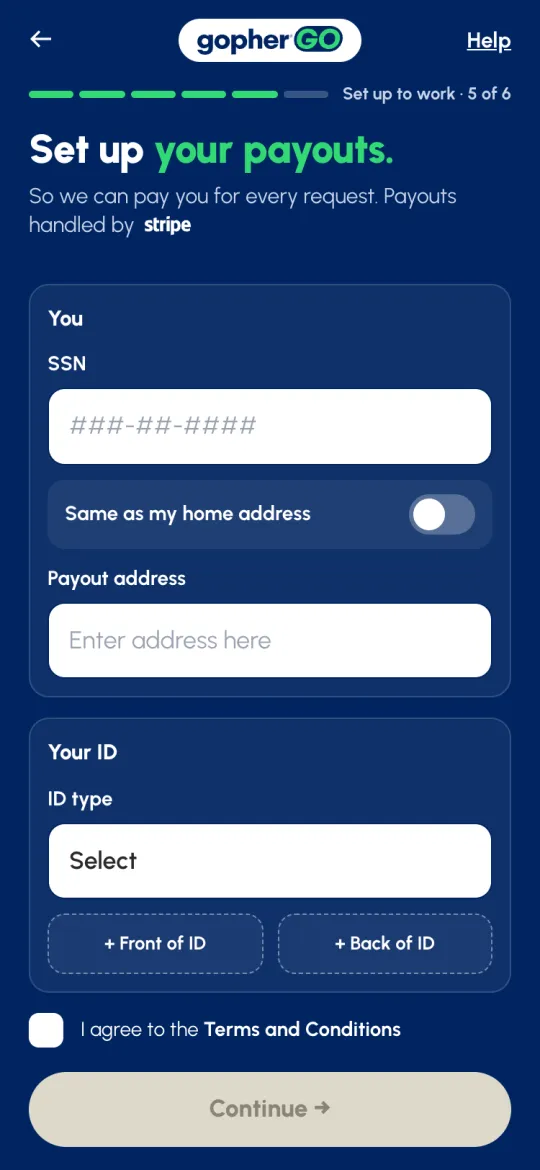
- Set up your payouts. Your SSN, your payout address (or Same as my home address), your ID type with photos of the front and back, and Stripe's terms. Stripe uses these to verify you.
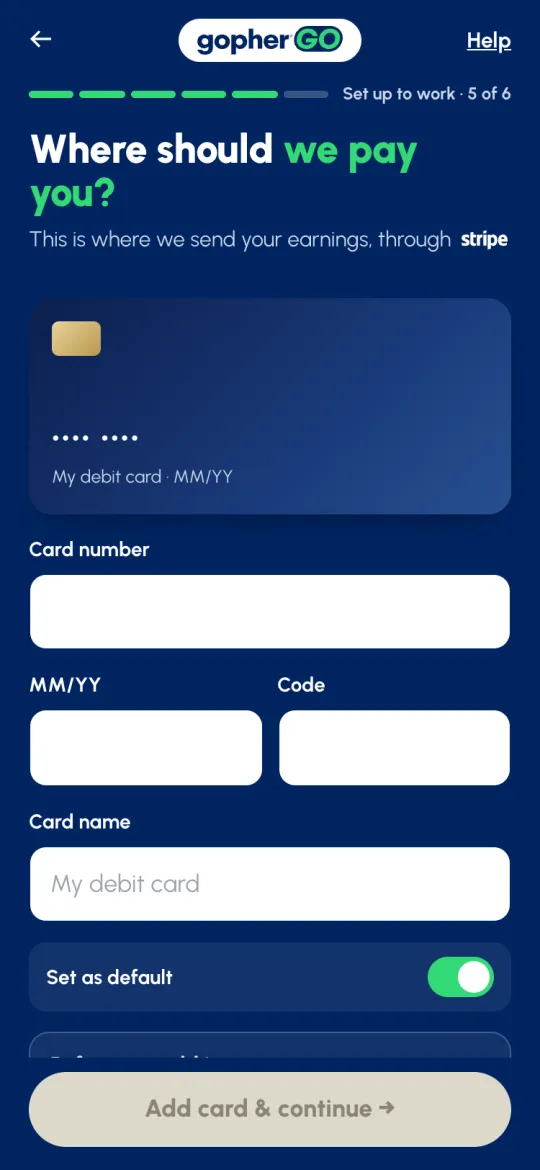
- Where should we pay you? Your debit card number, expiry and code, a name for the card, and Set as default. If you see Scan card, tap it to fill the card in with your camera. Tap Add card & continue →.
You can browse Available without a payout account, but you can't open a job or accept it until yours is ready. If Stripe is still checking your details, the app says Payout Account pending…. There's nothing for you to do: you can open and accept requests as soon as it's ready.
Skipped it at sign-up? Tap Account → Payout Account. It opens the same two screens, Payout account · 1 of 2 and 2 of 2. When it’s done you see Your card has been added!: tap Continue to go back to Payout Account. If Stripe can’t finish, you see We couldn’t finish with Stripe. and why: tap Try again (your card stays filled in) or Contact support.
Once it’s set up, Account → Payout Account shows Where you get paid.: your default card on top and any Other cards under it. Tap Add a debit card to add another: it opens the same Where should we pay you? screen. To remove a card, tap it under Other cards, then tap Remove this card. Gopher asks Remove this card? first: tap Remove card to confirm, or Cancel to keep it.
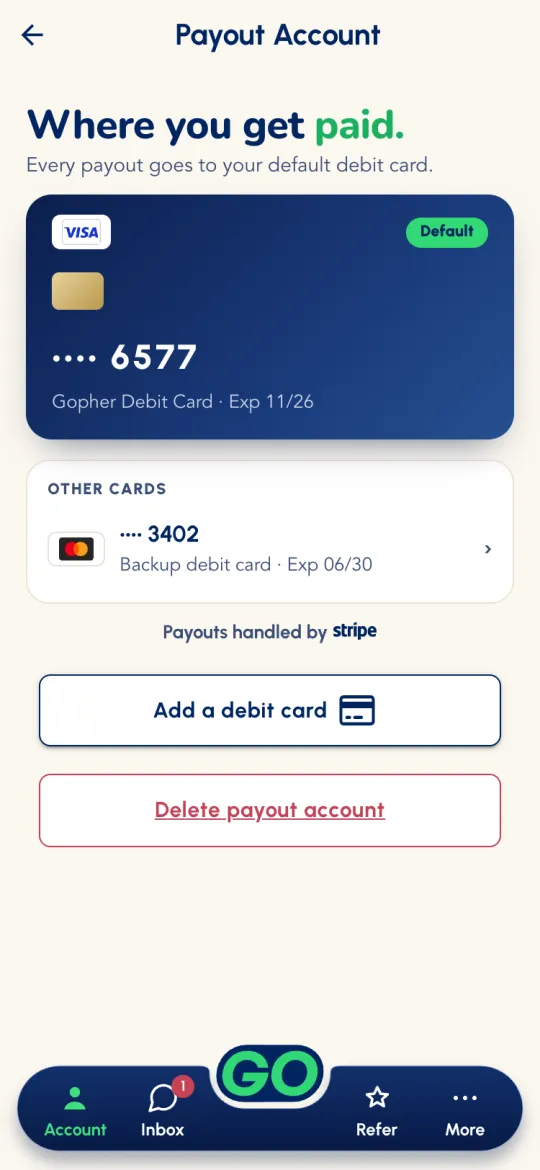
Open Payout Account in the menu, under Account. You see the same screen as in the app: Where you get paid., with your default card on top and any Other cards under it. If your payout card needs attention, you’ll see a red number on Payout Account in the menu. Open Payout Account to see what’s needed; the number goes away once you’ve seen it, and comes back only if a new problem comes up.
- Add a card. Click Add a debit card, then Debit card. Enter the card number, expiry date and security code, give the card a name, and choose whether it's your default. Click Add card. The card goes straight to Stripe, our payment partner. When it's added, you see Your card has been added!
- Change a card. Click the card to open its Card options. Switch on Set as default or change its name, then click Save.
- Remove a card. Open the card and click Remove this card. Gopher asks Remove this card? first: click Remove card to confirm, or Cancel to keep it. You can't remove your only eligible card: the page says Add a new eligible card to remove this one.
- Pending. If Stripe is still checking your details, the screen says Payout Account pending… and updates on its own. There's nothing for you to do.
- Delete your payout account. Click Delete payout account under Add a debit card. This deletes your whole payout account: your Stripe account, your saved cards and your payout history. It can't be undone, and you'd have to set up your payout account again in the app before you can be paid. To change the card you get paid to, add a new card instead. Click Delete permanently to go ahead, or Keep my payout account. You can't delete it while you have a live request, while a completed request is still waiting to be paid, or while you have only one card on file.
Work settings & radius
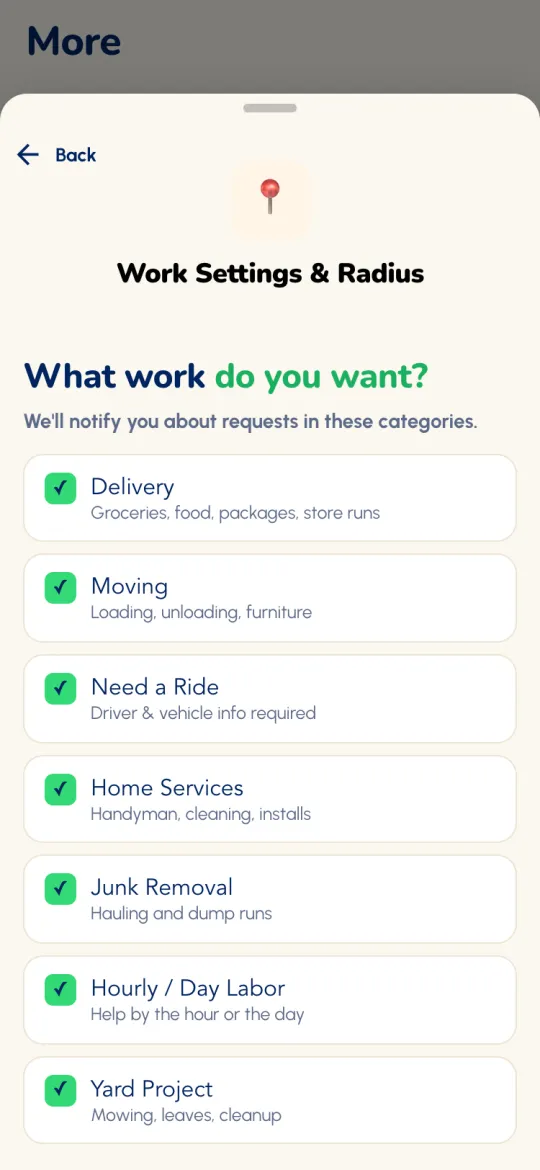
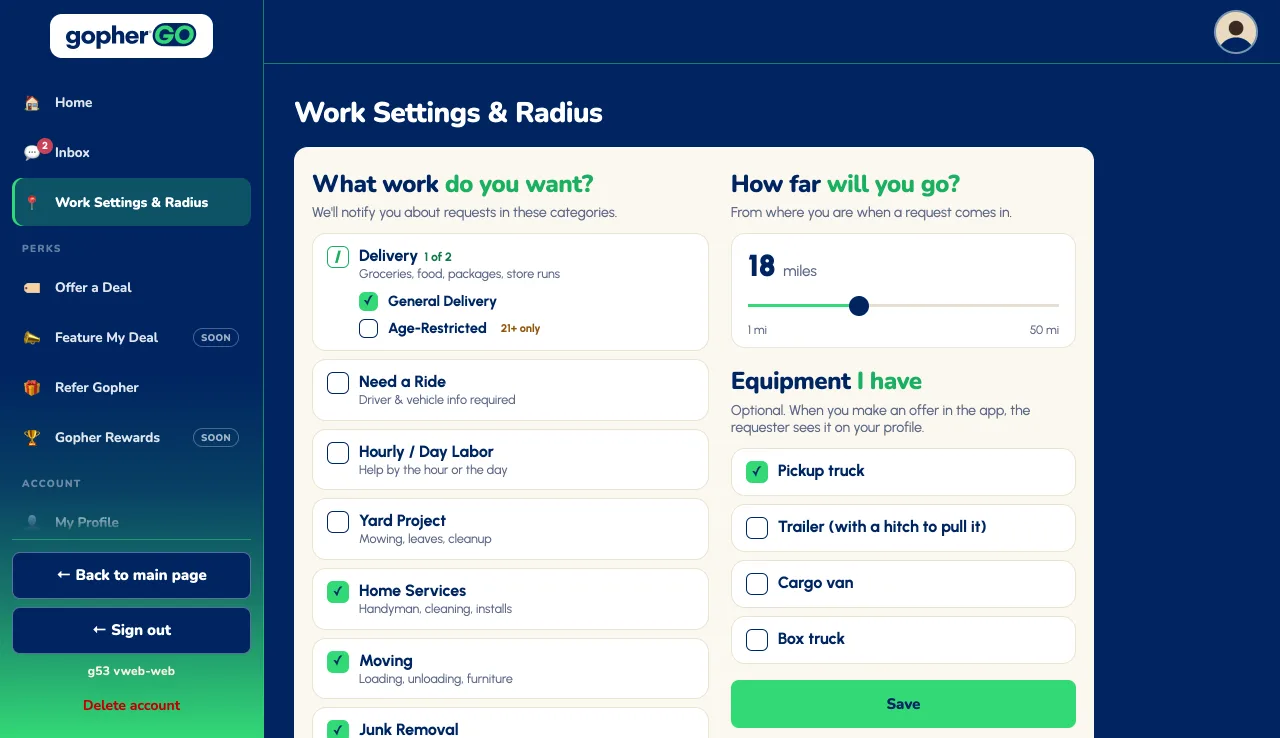
Tell Gopher Go what you want to do and how far you'll travel. Open More → Work Settings & Radius, tick the work you want, set your distance and tap Save. You're only alerted about requests in the work you ticked. Every 90 days, the app asks you to check them again.




- Delivery has two kinds: General Delivery and Age-Restricted (21+ only). Ticking Delivery ticks both. A / in the box means you've ticked one of them, and you still get Delivery jobs of that kind.
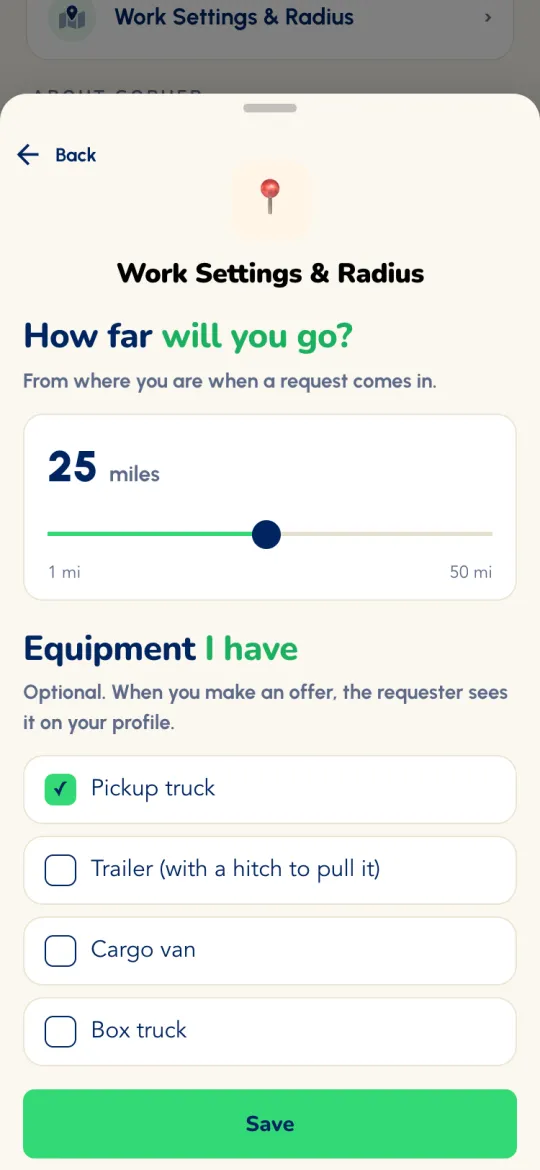
- How far will you go? Anywhere from 1 to 50 miles. It's the same range for every worker, and it starts at 25. It's measured from where you are when a request comes in, not from a fixed home base, so the work finds you wherever you are.
- Gopher Pro+ gets a second card under the Pro+ logo, Services radius, with its own slider up to 100 miles (the 51 to 100 stretch is shaded). It covers Hourly / Day Labor, Yard Project, Home Services, Moving and Junk Removal jobs. New-job alerts still only come for jobs within 50 miles; the farther jobs show in your job list.
- Equipment I have (optional): tick what you have: Pickup truck, Trailer (with a hitch to pull it), Cargo van, Box truck. When you make an offer in the app, the requester sees it on your profile, like Equipment: Pickup truck. It doesn't change which jobs you get.
- Under 21? You never see age-restricted jobs, whatever you tick.
- Need a Ride: to accept a ride, your car and driver details have to be complete in My Profile. If they aren't, the app says Add your car first.
Work Settings & Radius in the menu sets the work you get alerts for:
- Tick the work you want under What work do you want?. Delivery has General Delivery and Age-Restricted (21+ only).
- Set How far will you go? from 1 to 50 miles. It's measured from where you are when a request comes in.
- Under Equipment I have (optional), tick what you have: Pickup truck, Trailer (with a hitch to pull it), Cargo van, Box truck. Customers see it on your profile. It doesn't change which jobs you get.
- Click Save. Pick at least one kind of work to save.
Gopher Pro+ also gets Services radius, up to 100 miles, for Hourly / Day Labor, Yard Projects, Home Services, Moving and Junk Removal.
If your work settings are more than 90 days old, the dashboard opens here with Take a moment to make sure your work settings are up to date!. The rest of the menu waits until you click Save.
Know what you're looking at
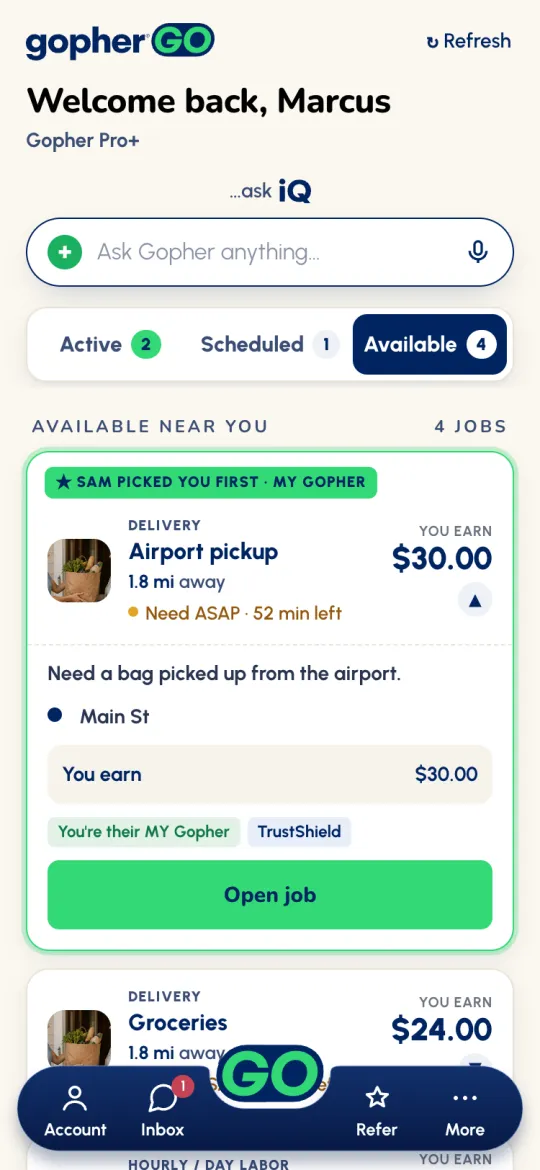
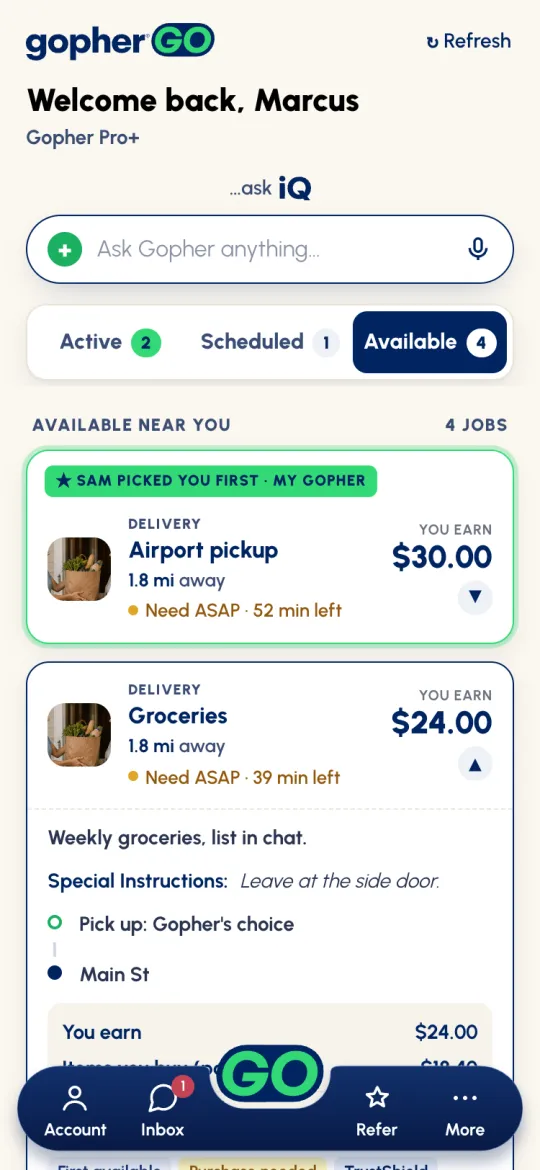
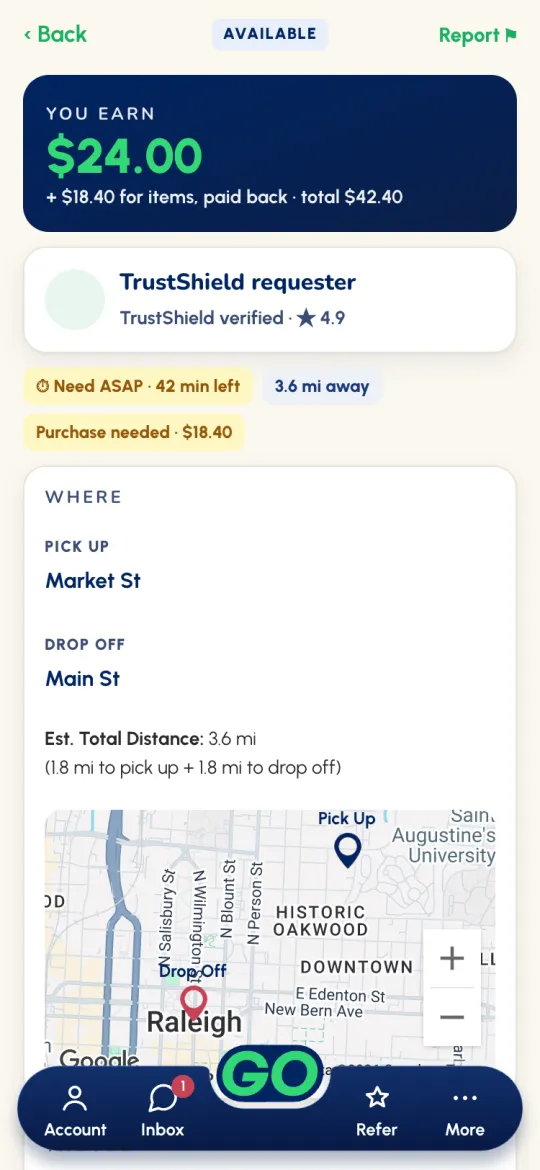
Jobs you can take are on Home → Available, under Available near you, nearest first. Jobs where a customer picked you go to the top. Every card shows the essentials:
- A photo and the kind of work (like DELIVERY), with a short title.
- N mi away, and the timing with the time left, like Need ASAP · 38 min left.
- You earn and the amount, or Make an offer if the customer hasn't set a price.
Tap ▼ to open the card right there. You'll see the description, any special instructions, the route (street names only until you're hired), the pay broken down, the job's labels (see Step 2) and Open job.
What the labels mean
An opened card and Request Details show labels that tell you what a job involves before you commit. The first one says how the customer chooses their worker:
Then, when they apply:

When does it need doing?
Every job has one of three timings. It decides what happens after you accept.
Once you accept a flexible or set-time job, it sits under Scheduled. There's no Start button: when you begin, tap In progress. Without a tier, it asks Start this job now?: tap Start job, or Not yet to keep it scheduled. We send you a reminder an hour before, and if you never start the job, it starts itself at the set time (or at the end of a flexible window).
Understand exactly what you'll make
The number you pocket is always You earn. Gopher takes no cut and charges you no fees, so You earn $20.00 means $20.00 goes to your card.
Jobs with a purchase
When the customer needs you to buy something, the card adds what you'll spend, and the total is what's paid to you, in one payout:
Before you accept one, the app reminds you: You buy the items first. If you can't or don't want to, don't accept it.
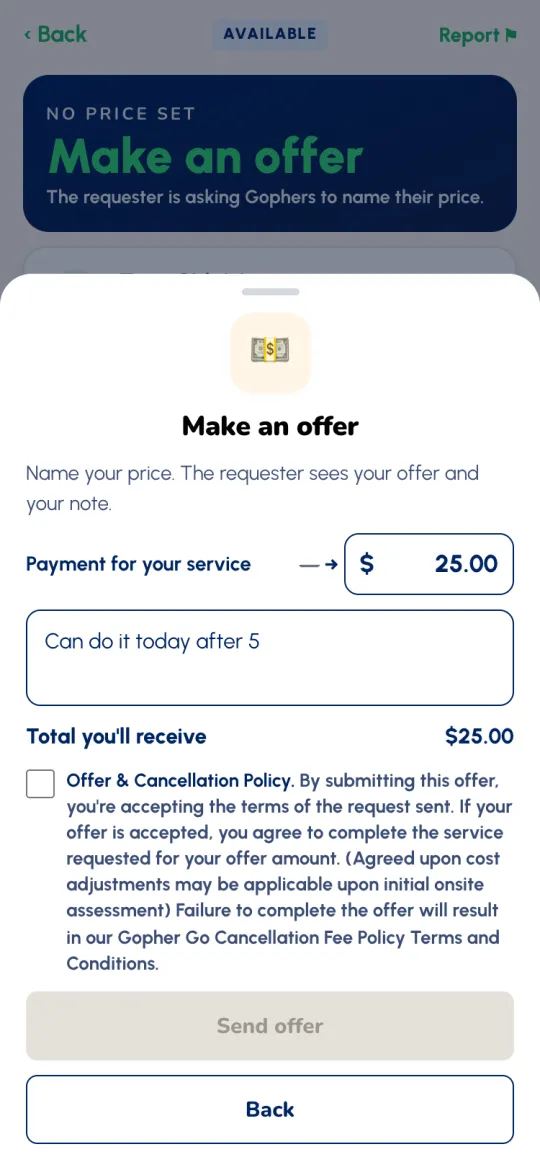
Make an offer
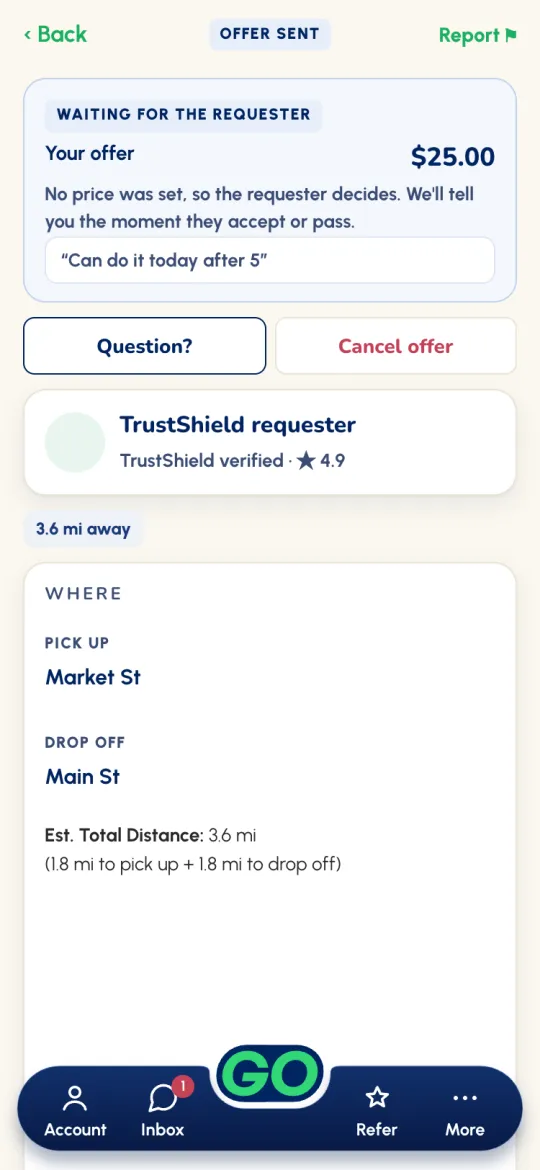
Some customers don't set a price. Their cards say Make an offer, and they're asking workers to name their price. Open the job and tap Make an offer. Enter your Payment for your service (and the cost of items, where there are some), add a note if you like, tick the Offer & Cancellation Policy, and tap Send offer. The job then shows OFFER SENT until the customer decides, and you're told either way. Changed your mind? Cancel offer.
Crew and hourly jobs
On a crew job, the card shows the pay for the whole crew, like You earn $180.00 · crew of 3. Hourly jobs show the rate and the number of hours.
Decide and lock it in
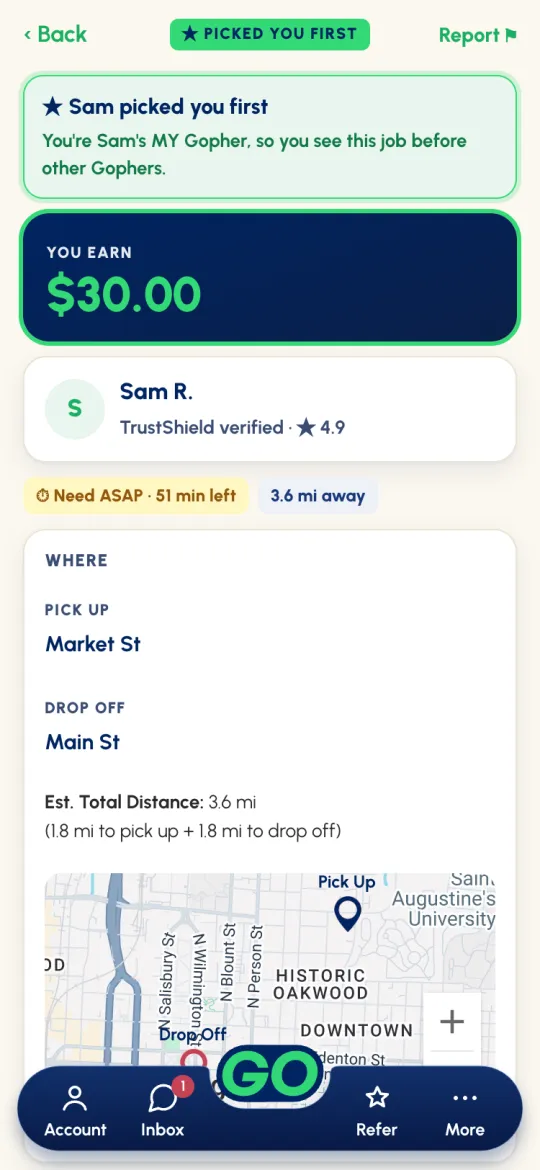
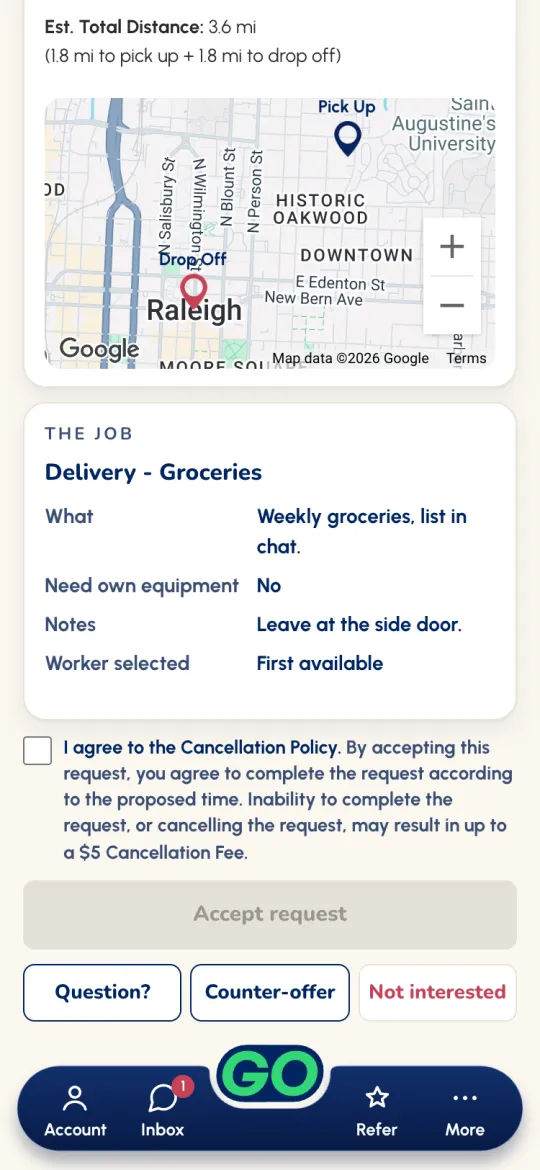
Tap Open job for Request Details: what you'll earn, the customer (with their ★ rating and how many requests they've made), the labels, WHERE with a map, and THE JOB. Then choose:
- Accept request. Tick I agree to the Cancellation Policy (and the Liability Waiver on Home Services, Moving, Junk Removal, Hourly / Day Labor and Yard Project), then tap Accept request. On a First available job, or when you were picked first, you're hired. On I'll select my worker, you'll see YOU SAID YES while the customer chooses (Cancel acceptance takes it back). If Accept can't get your location or a connection, the app tells you which (Location not found or Can't reach Gopher): turn Location on or find signal, then tap Accept again.
- Question? Need more info first? Tap Question? to message the customer.
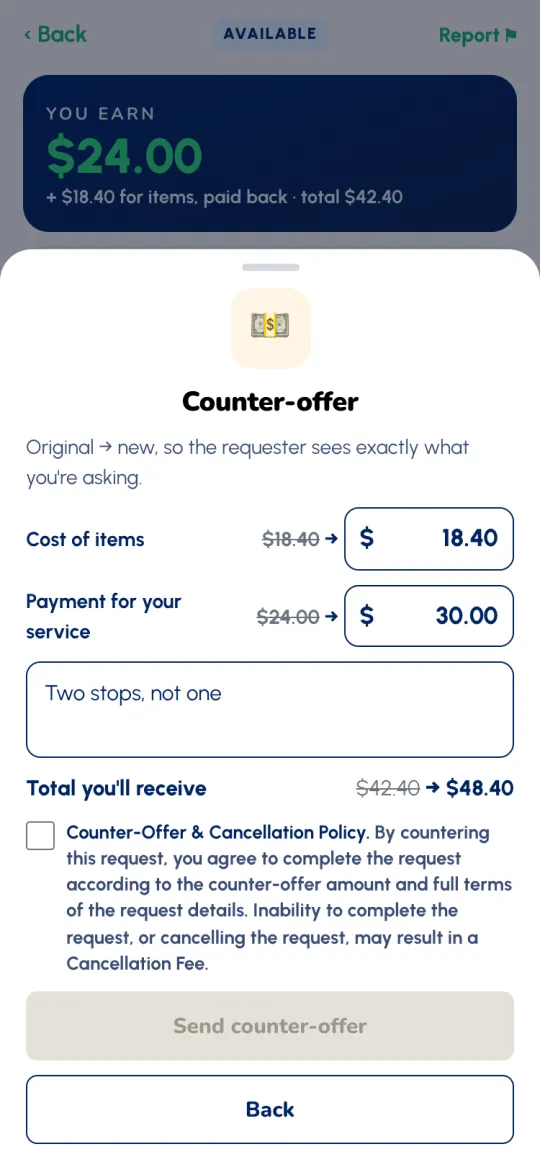
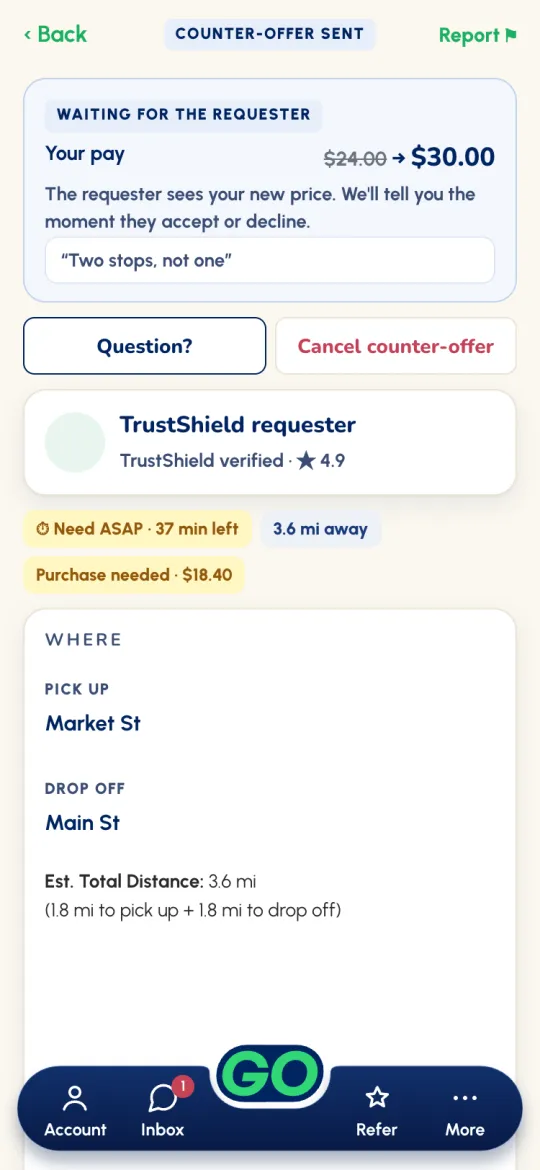
- Counter-offer. Want the job at a different amount? Tap Counter-offer, enter your new pay (and the new cost of items, where it can change), say why, tick the Counter-Offer & Cancellation Policy and tap Send counter-offer. The customer sees the old and new amounts side by side and accepts or declines. The job then shows COUNTER-OFFER SENT until the customer decides. Changed your mind? Tap Cancel counter-offer and the job goes back to Request Details, where you can accept at the posted pay, send a new counter-offer, or tap Not interested. Keep it reasonable: a 3-mile, $5 trip might fairly counter to $10, not $30.
- Not interested. The job leaves your Available list for good.
Tools while the job's active
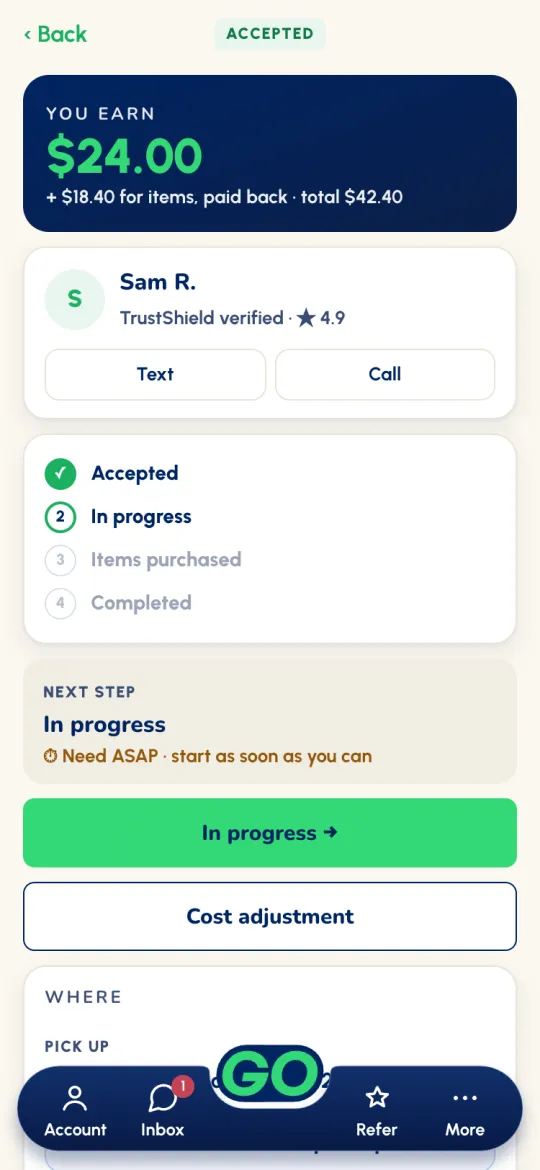
Once you're hired, the job screen has everything you need, top to bottom:
- You earn, with any items paid back and the total.
- The customer, with Text (chat in the app) and Call. Send a quick intro message at the start of every job; "On my way!" goes a long way.
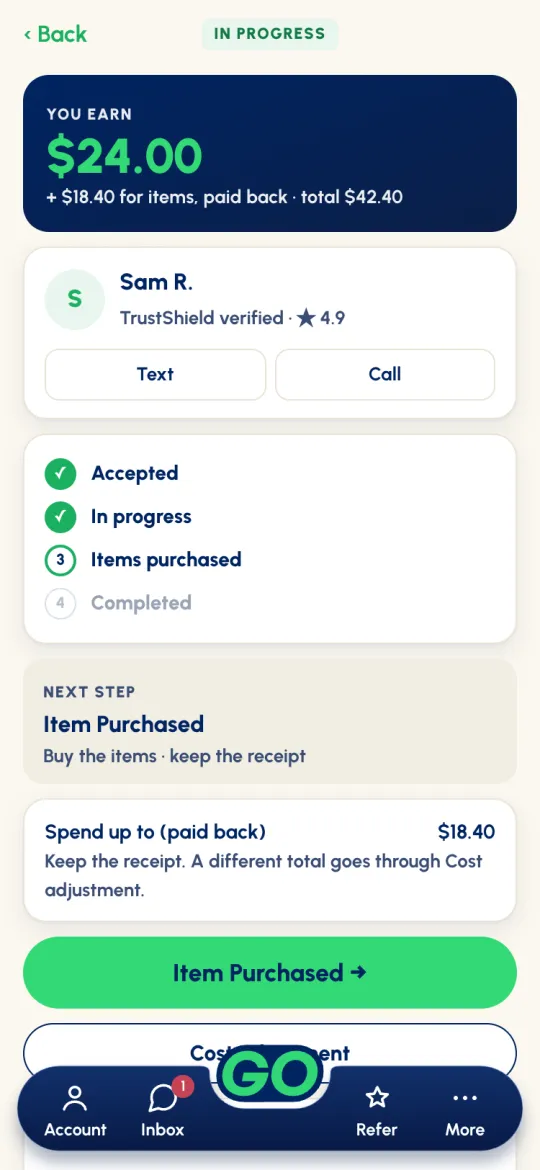
- The steps so far, and NEXT STEP with the green button to update it (see Step 7).
- Cost adjustment, if the price needs to change (see Cost adjustments).
- WHERE, with Directions to pick-up and Directions to drop-off (or Directions to the job). They open Apple Maps on iPhone and Google Maps on Android. If the pick-up says Gopher's choice, buy the items at any store that has them.
- THE JOB: when, what, the customer's notes and photos. At the bottom, Cancel job (see Cancelling).
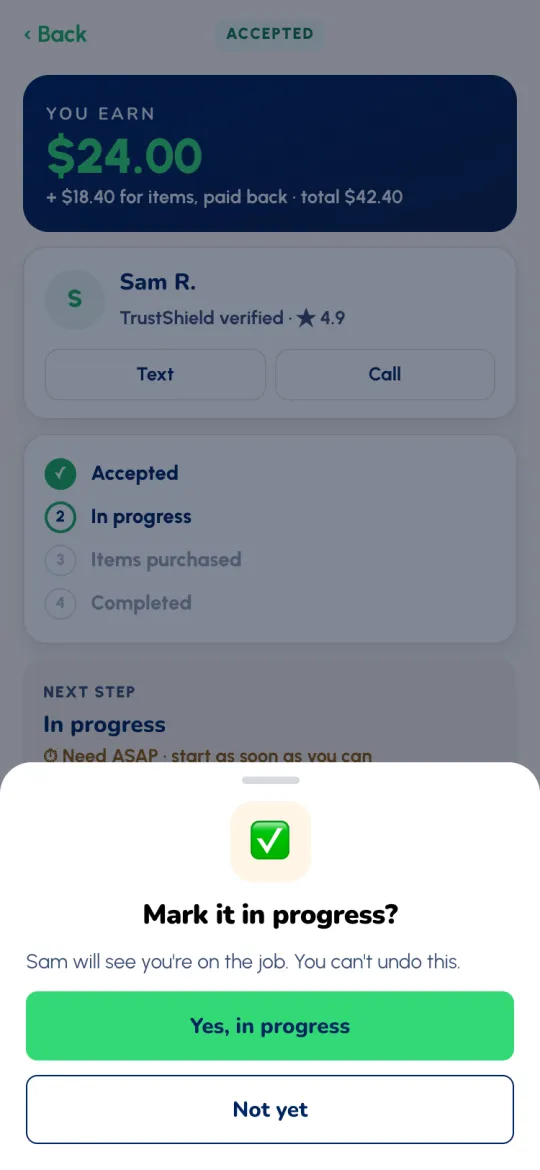
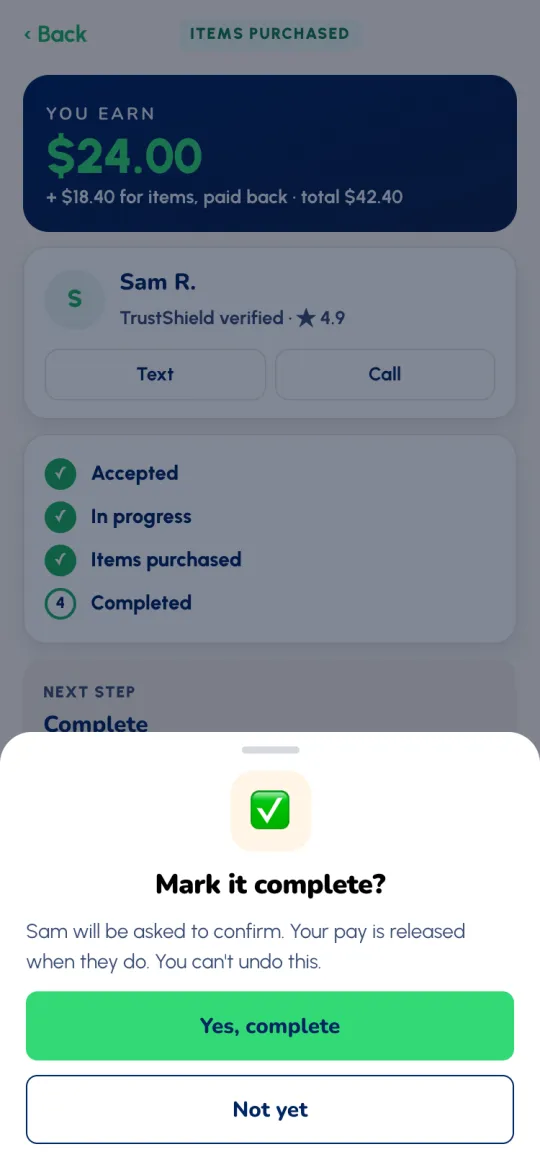
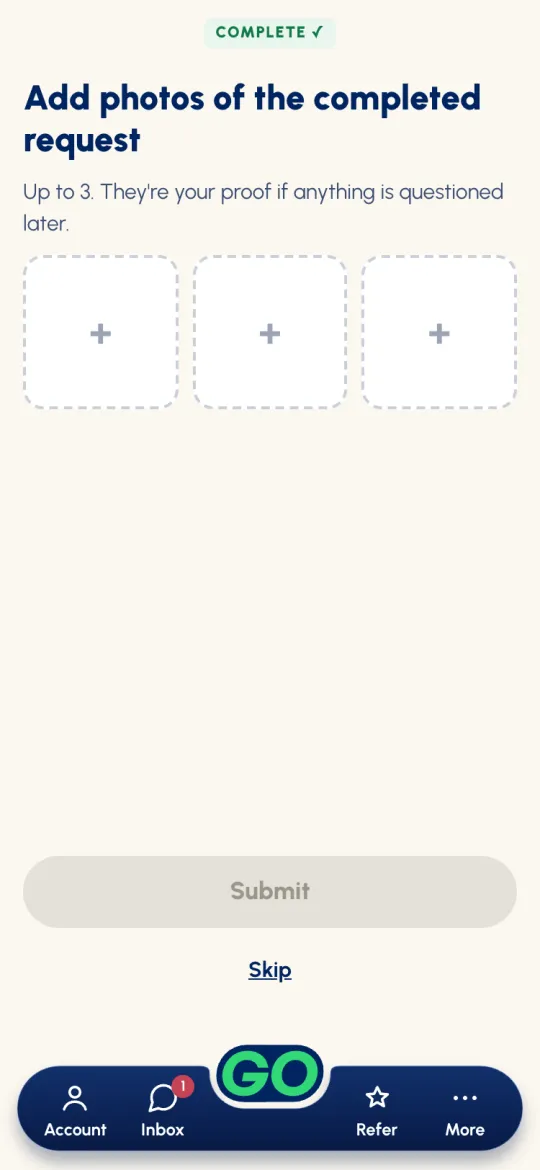
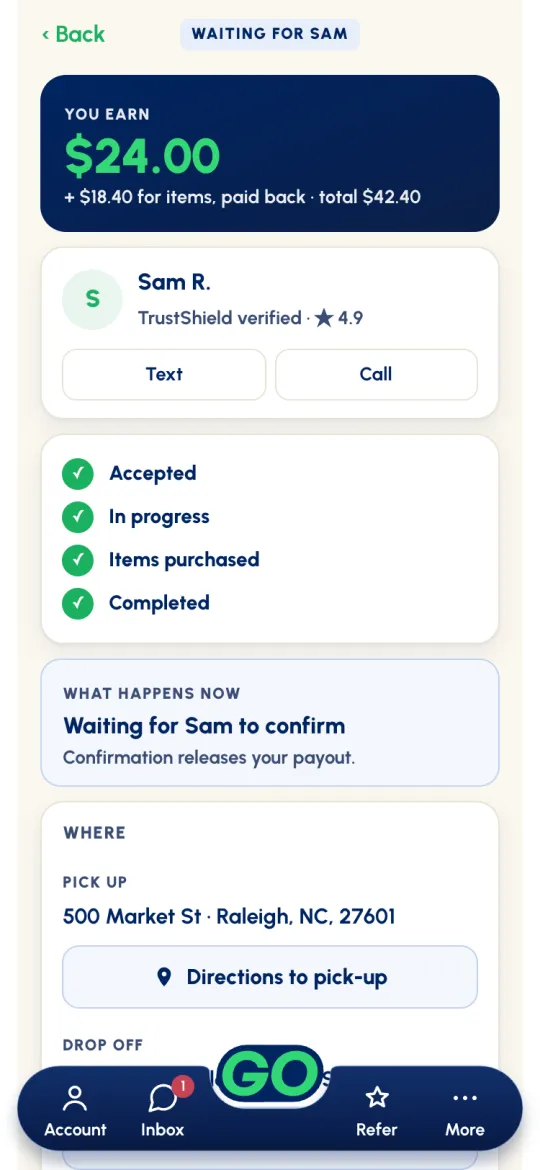
Update in real time → get paid
The big green button always shows the next step. Tap it at the right place and confirm. Every update is GPS- and time-stamped, so make each one where it happens.
Payouts & speed
When the customer confirms the job (or it confirms itself after 48 hours), your pay and any items you bought go to your debit card together, in one payout, with no fee. You get a Payday!! notification when it's on its way. How fast it lands depends on where you are in your journey.
Your first 10 paid jobs
For your first 10 paid jobs, payouts arrive in about 2 hours after the customer confirms.
After that, or with Gopher Pro / Pro+
From then on, payouts are instant: about 1–2 minutes. Gopher Pro and Pro+ workers get instant payouts from their very first job.
Cost adjustments
Use a cost adjustment when the price needs to change: the items cost more or less than the customer's estimate, or the job turned out bigger or smaller. You can send one while you're on the job, up until you complete it (a scheduled job has to be started first), and after completion only if the customer opens a dispute.
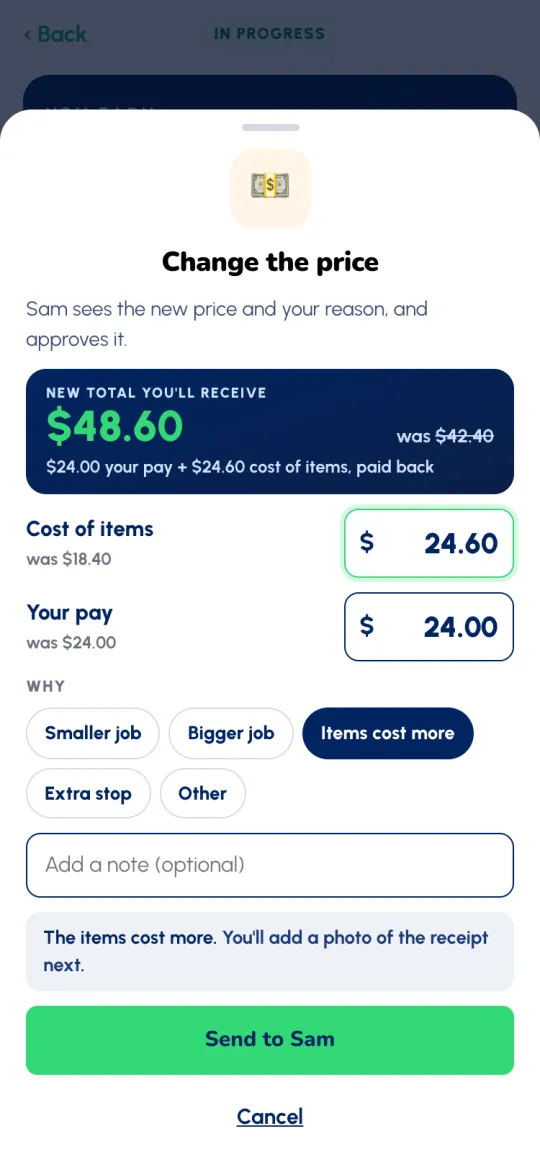
- On the job screen, tap Cost adjustment. Change the price opens.
- Change the Cost of items, Your pay, or both. On hourly jobs you change the rate, the hours or the crew instead. The navy box shows the New total you'll receive.
- Pick why: Smaller job, Bigger job, Items cost more, Extra stop or Other, and add a note if it helps.
- Tap Send to Sam. If the items cost more, you'll add a photo of the receipt next.
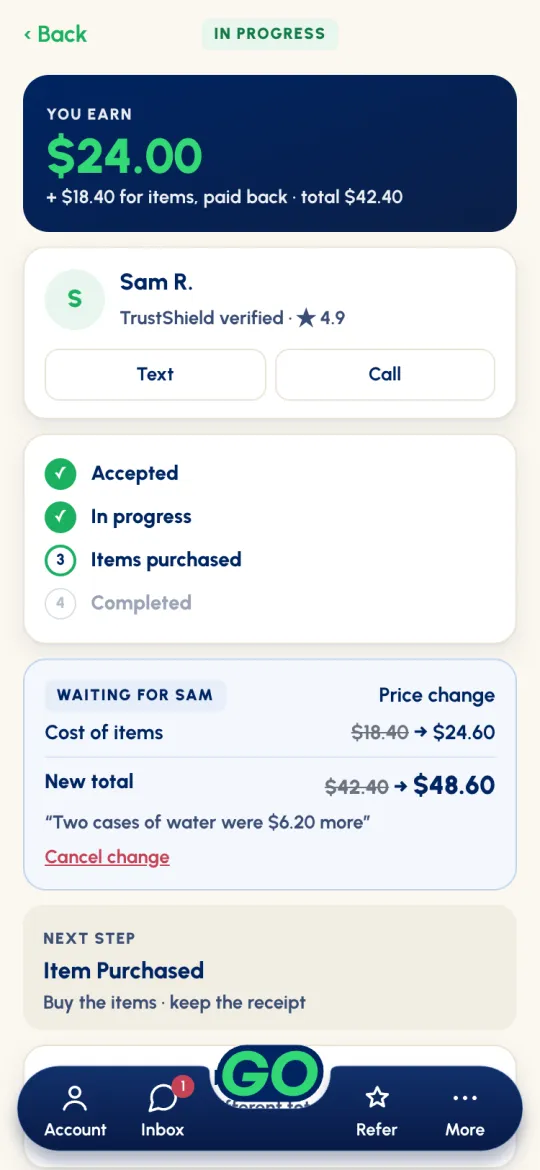
While the customer decides, the job shows WAITING FOR SAM with the old and new amounts (Cancel change takes it back). You're notified when they approve or decline. You can't complete a job while a cost adjustment is waiting: the button reads Complete · after Sam approves.
Example
The customer budgeted $18.40 for groceries that ring up at $24.60. Send a cost adjustment with the cost of items at $24.60, pick Items cost more and add the receipt. Done.
Best practices
- Item costs are never earnings. If the estimate is off by more than $1, over or under, adjust to the exact amount and add the receipt. Put yourself in the customer's shoes.
- Big jumps? Adjust before you buy. The customer's card is held for the total plus 20%. If the new total goes above that, the app says Additional authorization needed: don't buy the extra items until the customer approves and it's funded. If the new amount fails, the job goes back to the original amount.
- Going down? The app checks with you (Your pay goes down by…). Only send it if you and the customer agreed on it.
Age-restricted deliveries
For age-restricted items, the law and our policy are strict, and the customer agreed to these terms when they ordered. Only workers 21 and older see these jobs, and they're always handed over in person. Never leave them at the door.
Check the ID before you hand anything over
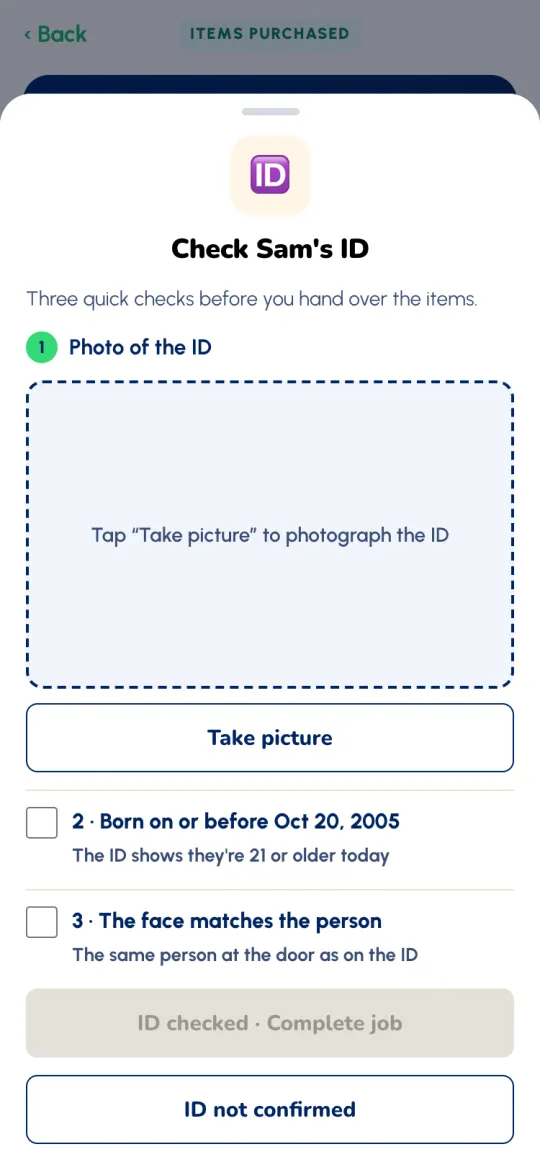
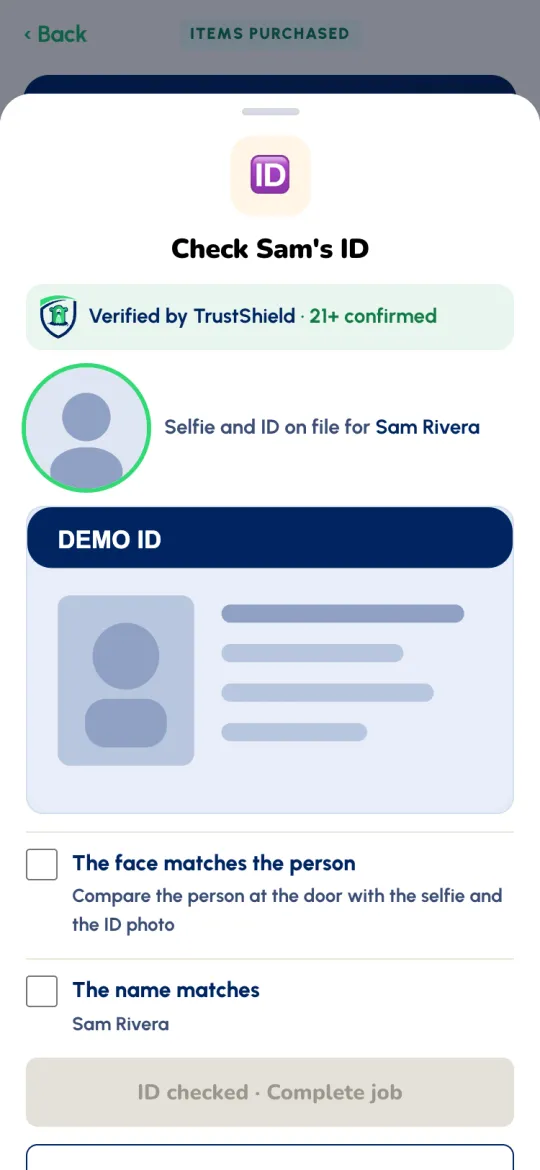
When you tap Complete, Check Sam's ID opens:
- Most customers: three quick checks. 1, take a photo of their ID. 2, confirm they were born on or before the date shown (21 or older today). 3, confirm the face matches the person.
- TrustShield customers: the app shows Verified by TrustShield · 21+ confirmed with the selfie and ID they have on file. Check the face matches the person and the name matches. No photo needed.
If the camera frame stays blank, Gopher Go tells you: Your camera isn’t showing. Tap Try again to restart the camera, or Use camera app to take the ID photo with your phone’s camera. If you leave the app while the camera is starting, it comes back by itself when you return.
Then tap ID checked · Complete job.
Customer not there?
You must be at the drop-off. Tap Requester not here? We’ll text them now. to start a 10-minute timer, alert the customer by text, email and notification, and GPS-record your location and wait. The screen shows Waiting for {name}, a countdown bar, then red Time’s up at 0:00.
If they’re still absent, tap Requester no show and leave with the items. The job shows NO-SHOW and You reported a no-show · Gopher support is reviewing your payout. After support decides quickly, a No-show reviewed pop-up confirms your payout is on its way.
Customer arrives during the countdown? Tap ID and identity confirmed, or Back if you already tapped ID not confirmed, to return to Check {name}’s ID. Do the same checks as above: for most customers, photograph their ID and tick both checks; for a TrustShield customer, tick the two checks (no photo needed). Then tap ID checked · Complete job, and the job completes as ID checked.
ID doesn't check out?
Tap ID not confirmed. You can complete it as Complete request - no delivery, go back and send a cost adjustment, or cancel the request; cancelling here never costs you a cancellation fee.
Something wrong? Disputes
A dispute is between you and your customer, and most get sorted out between the two of you. If a customer disputes a job you completed:
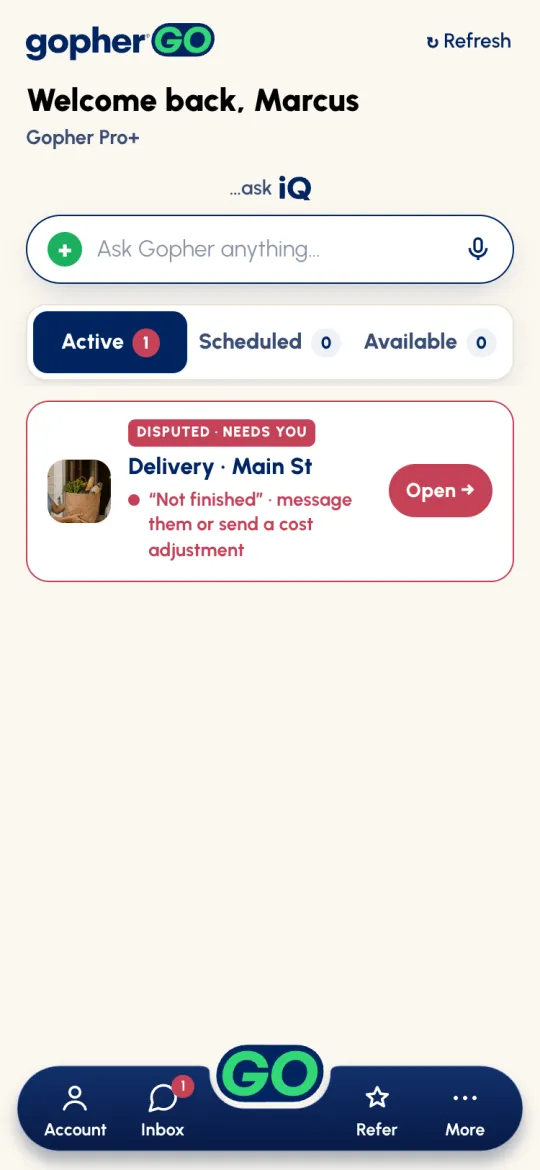
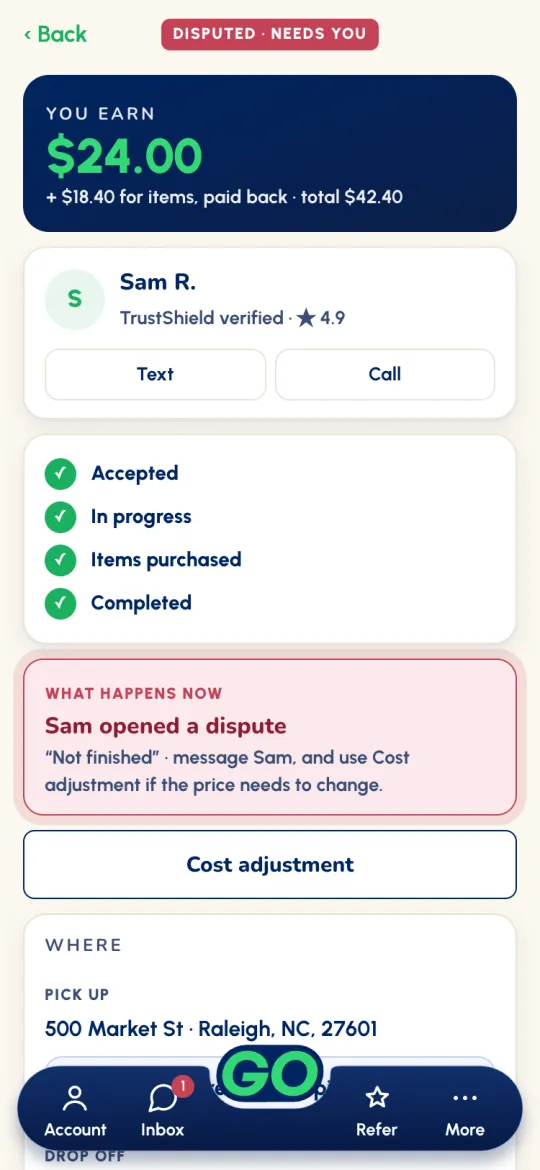
- You get a push notification and an email. On Home, the job shows DISPUTED · NEEDS YOU. Open it to see what the customer said.
- Message them and make it right. If the price needs to change, send a cost adjustment; it's available while the dispute is open.
- When they're happy, they confirm the job and you're paid as usual.
- Can't agree? Gopher support reviews it (the job shows UNDER REVIEW) and decides: you're paid the agreed amount, or the request is cancelled. You both get an email with the decision. You can also email support@gophergo.io any time.
Rating & MY GophersRating
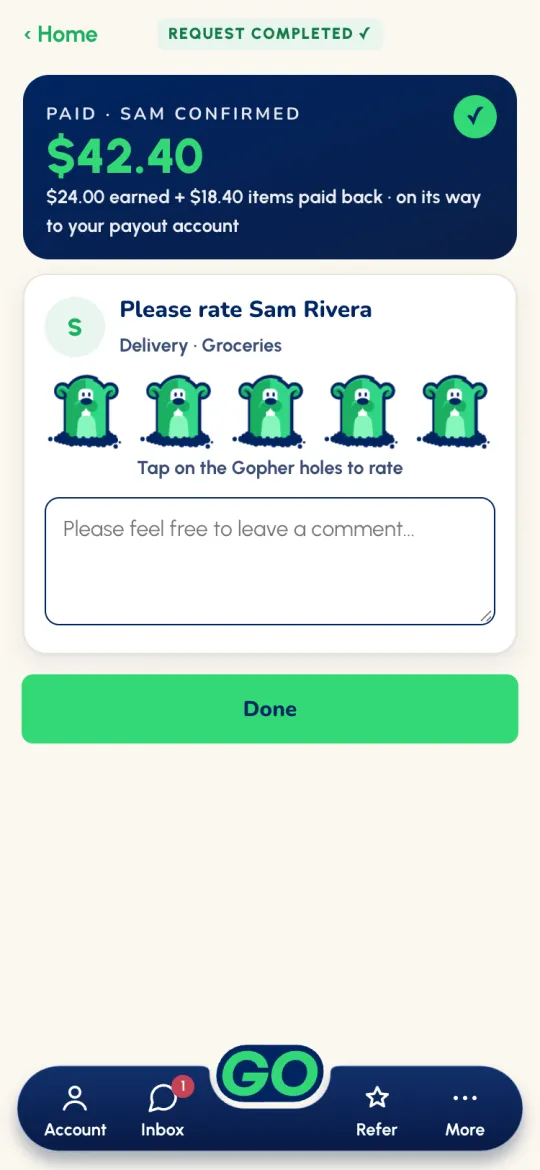
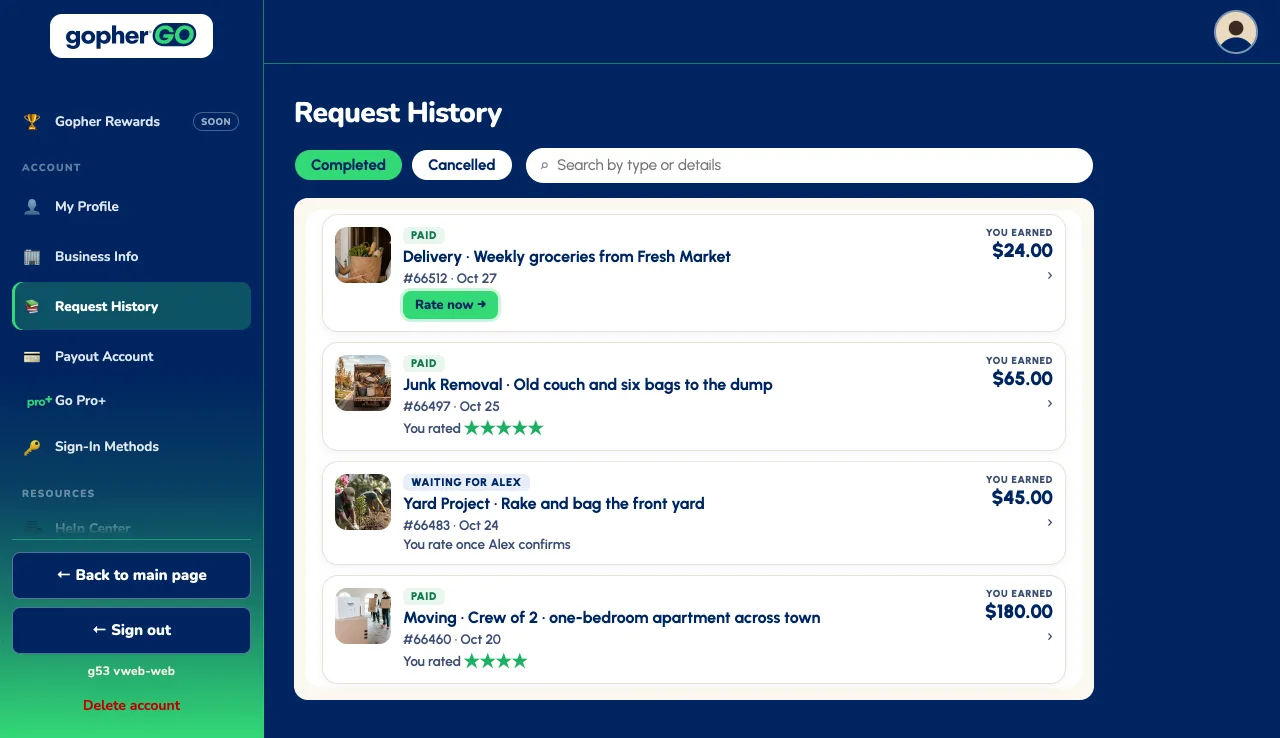
When the customer confirms and your payout starts, the app asks you to rate them: tap the Gopher holes (one to five), add a comment if you like, and tap Done. Ratings keep the marketplace trustworthy both ways. Missed it? Open the job in Request History and tap Rate now →. After a no-show, nobody confirmed, so the rating screen says Paid · Gopher support reviewed it; you still rate the customer.
Becoming a MY Gopher
When customers rate you, they can add you as one of their MY Gophers. Then they can:
- Pick you first. When they post a job and choose you, you see it before other workers, with ★ PICKED YOU FIRST on the card (see Step 2).
- Recommend you. We invite them to recommend you to people they know.
Missed rating a customer?
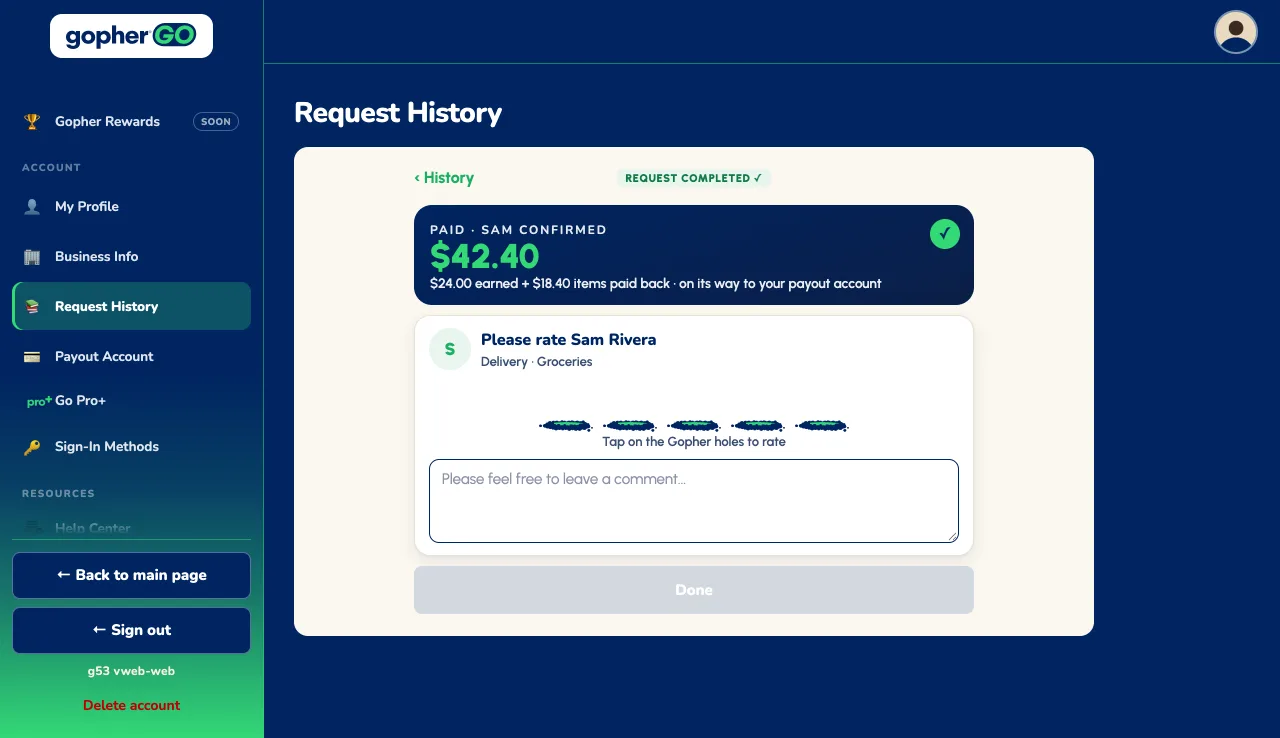
- In Request History, click Rate now → on the job.
- Click the Gopher holes (one to five), add a comment if you like, and click Done.
- ‹ History takes you back.
A job that still says You rate once (customer) confirms can be rated after they confirm.
Request History
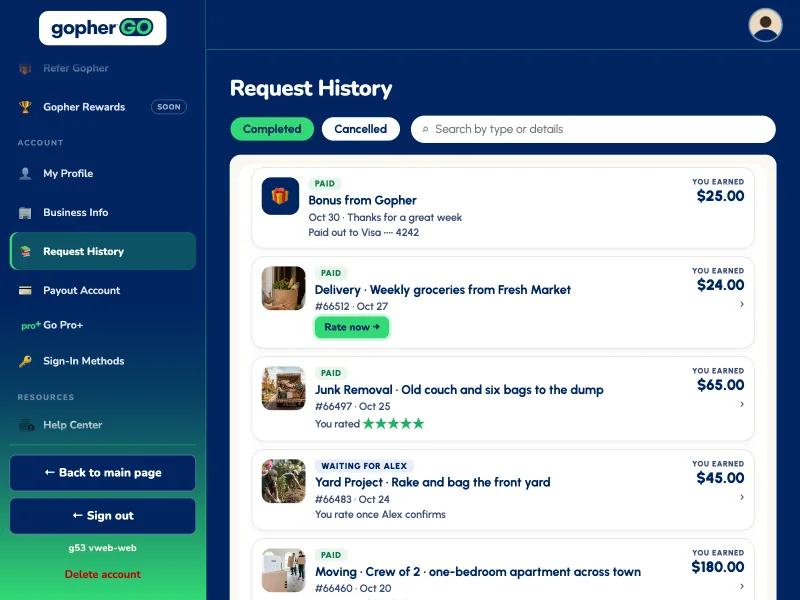
Account → Request History lists your Completed and Cancelled jobs, with a search bar. Each card shows what you earned and where it stands: PAID, WAITING FOR SAM, PAYOUT ON HOLD, DISPUTED or DISPUTE RESOLVED.
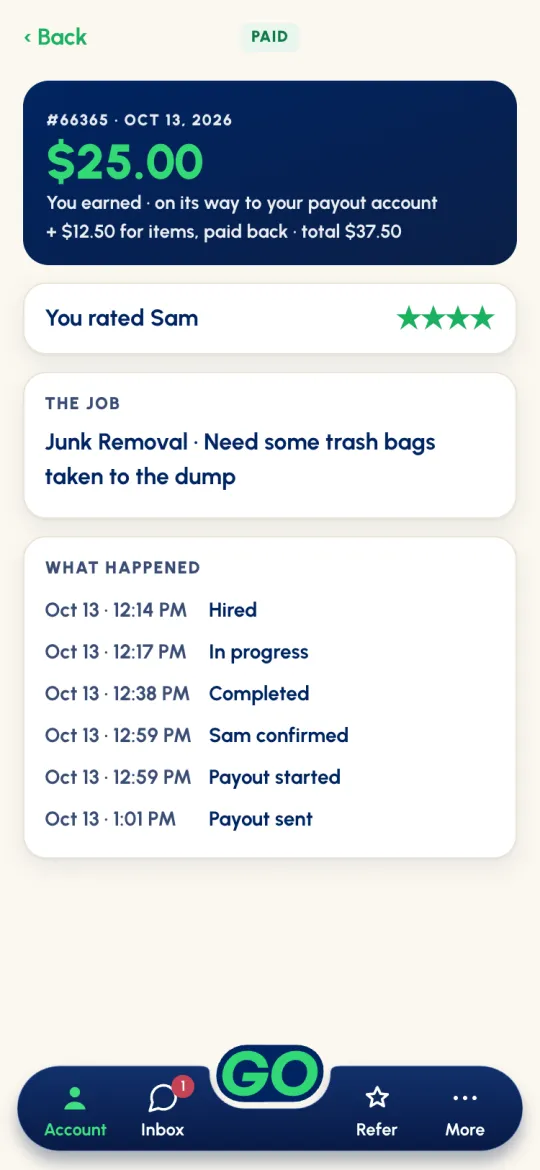
Tap a job to see WHAT HAPPENED, step by step: Hired, In progress, Completed, Sam confirmed, Payout started, Payout sent. Once the payout is sent, the top of the job names the card it went to, like You earned · paid out to Visa •••• 4242. If it ever says Payout didn't go through · add a new debit card, replace your card in Payout Account.
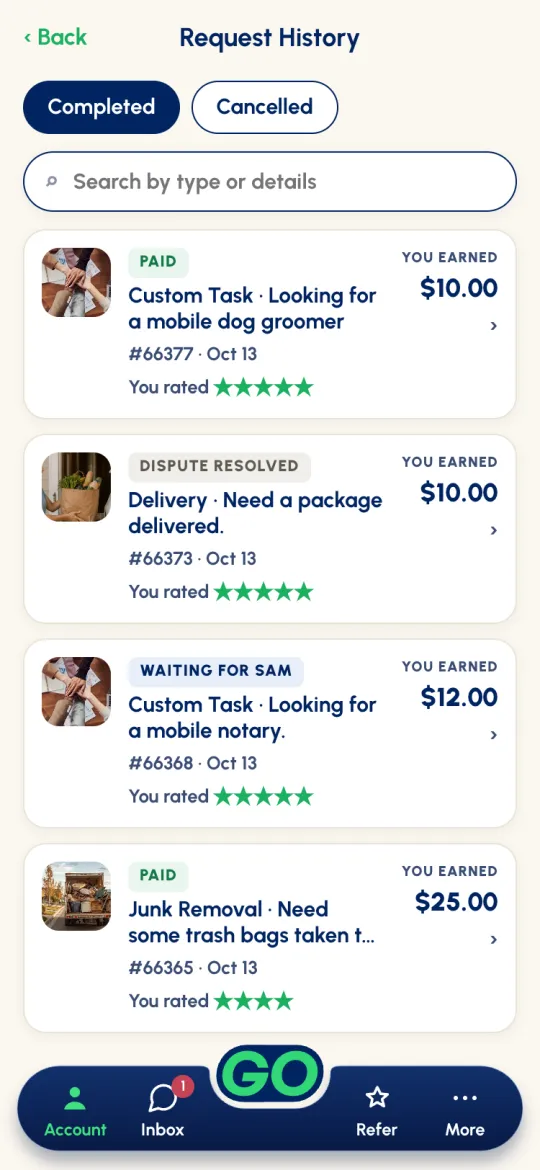
Request History lists your Completed and Cancelled jobs, with Search by type or details. Each card shows what you earned and where it stands, like PAID or WAITING FOR (customer).
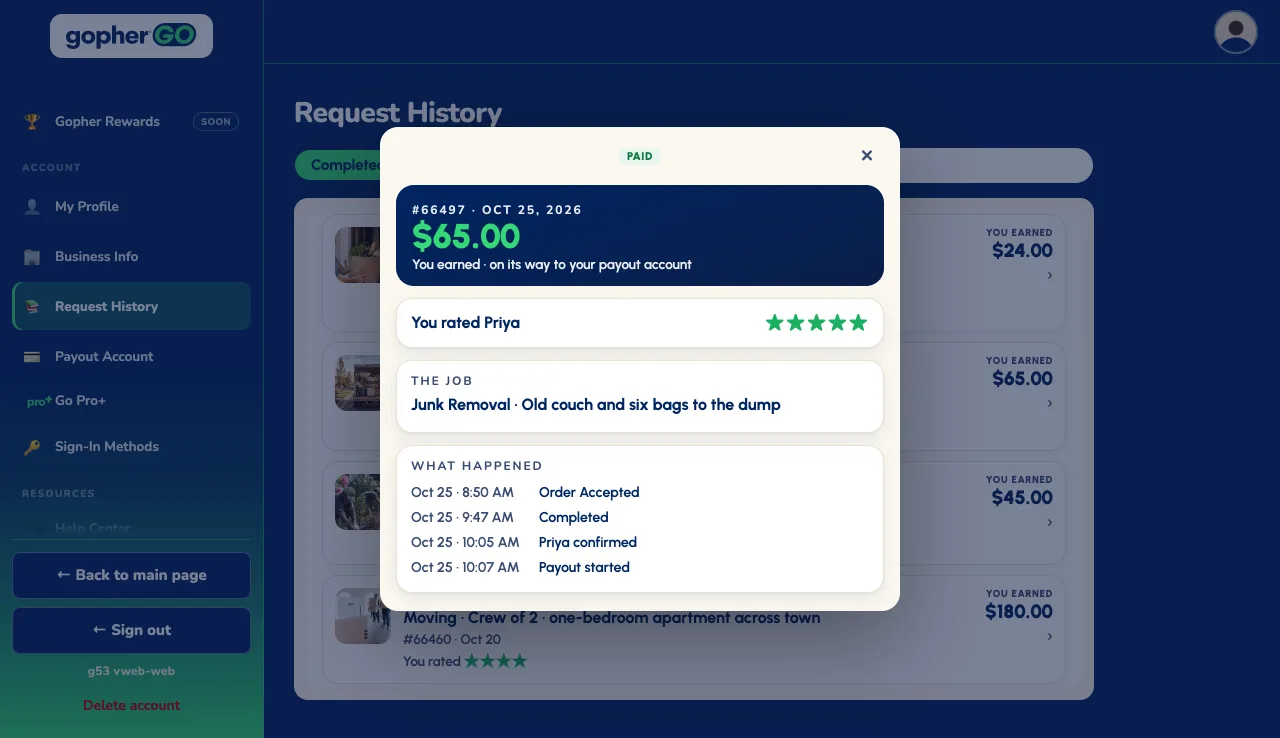
Click a job to open its page:
- what you earned and, once it’s paid, the card it went to, like paid out to Visa •••• 4242;
- the job;
- WHAT HAPPENED, step by step.
Collecting a Bonus
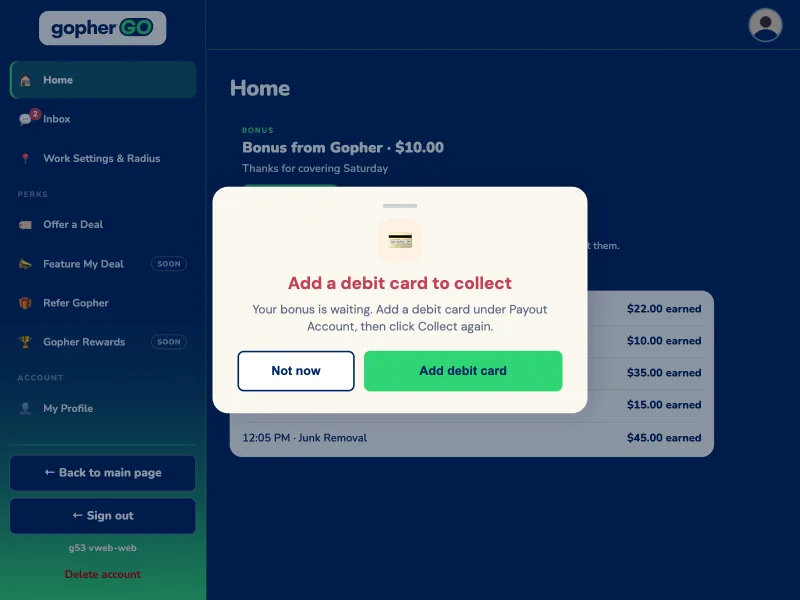
Sometimes Gopher sends you a Bonus. It shows at the top of Home as a navy card: Bonus from Gopher · $25.00, with a short note from the Gopher team. It never expires: it stays there until you collect it. You also get a push notification; tapping it opens Home.
- Tap Collect bonus.
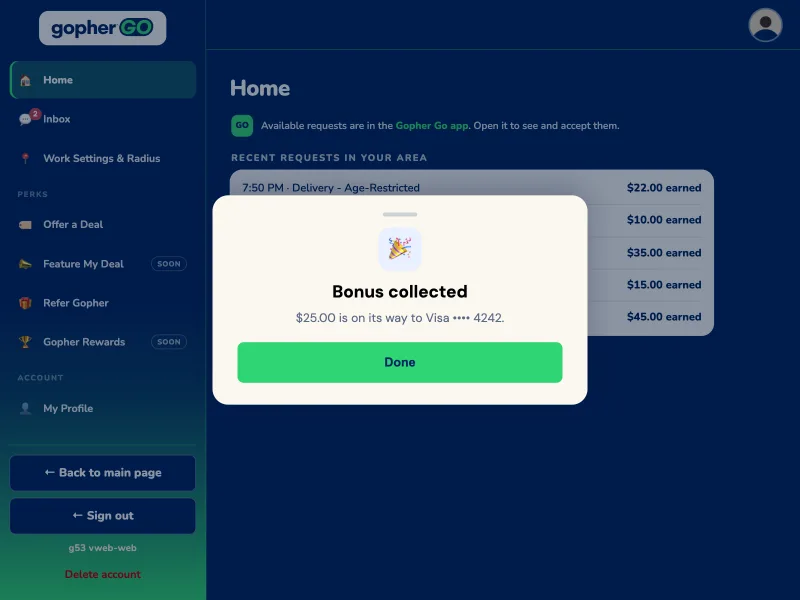
- Bonus collected tells you where it went, like $25.00 is on its way to Visa •••• 4242. Tap Done.
- The Bonus moves to Account → Request History → Completed as Bonus from Gopher, with the amount under YOU EARNED and the note. It reads ON ITS WAY until it pays out, then PAID with the card it went to, like Paid out to Visa •••• 4242.
A Bonus pays out the same way a job does: no fee, at your usual payout speed.
Sometimes Gopher sends you a Bonus. It shows as a navy card at the top of Home: Bonus from Gopher · $25.00, with a short note from the Gopher team. It never expires: it stays there until you collect it.
- Click Collect bonus.
- Bonus collected tells you where it went, like $25.00 is on its way to Visa •••• 4242. Click Done.
- The Bonus moves to Request History → Completed as Bonus from Gopher, with the amount under YOU EARNED and the note. It reads ON ITS WAY until it pays out, then PAID with the card it went to, like Paid out to Visa •••• 4242.
A Bonus pays out the same way a job does: no fee, at your usual payout speed.
Gopher Pro & Pro+
Gopher Pro and Pro+ are optional tiers with a background check through Yardstik. Pass it once and you carry a badge on every job, so the customer requesting you has real assurance, and you get perks that help you earn more.


| What you get | No tier | Gopher Pro & Pro+ |
|---|---|---|
| Free to join, see jobs and accept them | ✓ | ✓ |
| Make offers and counter-offers | ✓ | ✓ |
| Instant payouts (about 1–2 minutes) | After 10 paid jobs | From your first job |
| Take more than one job at a time | — | ✓ |
| See new requests before workers without a tier | — | ✓ |
| A verified badge on your profile | — | ✓ |
| Services radius up to 100 miles for Hourly / Day Labor, Yard Project, Home Services, Moving and Junk Removal jobs | — | Gopher Pro+ only |
Every worker's work radius goes up to 50 miles, and the counter-offer cap is the same for every worker. Gopher Pro+ adds the services radius, up to 100 miles.
How to get it
Tap Account → Become a Gopher Pro (or, on Home's Active tab, Learn more about becoming a Gopher Pro here.). It opens our website, where you choose Pro or Pro+ and start the background check. Results usually take 1–3 days, then we add the badge and perks to your Gopher Go account. You'll see Gopher Pro Verified (or Pro+ Verified) on your Account.
Click Go Pro+ under Account in your dashboard menu, then Gopher Pro · $20 or Gopher Pro+ · $30. Our tiers page opens in a new tab with that badge picked, where you start the background check. Results usually take 1–3 days, then we add the badge and perks to your Gopher Go account. Once you’re a Gopher Pro+, the Go Pro+ row goes and Gopher Pro+ Verified shows under My Profile.
Already a Gopher Pro? Go Pro+ for $10. As a Gopher Pro, click Go Pro+ under Account in your dashboard menu. Yardstik adds the MVR (motor vehicle record) search to the Gopher Pro check you already passed, for $10 instead of the full $30. Click Send invitation and Yardstik emails an invitation to the email on your Gopher Go account; Check your email confirms it’s on its way. When the MVR clears, your badge changes to Gopher Pro+ and the Pro+ perks (the 100-mile services radius) are added. The $10 add-on is only here in your dashboard, not on our tiers page.
Refer Gopher
Tap Refer on the bottom bar.
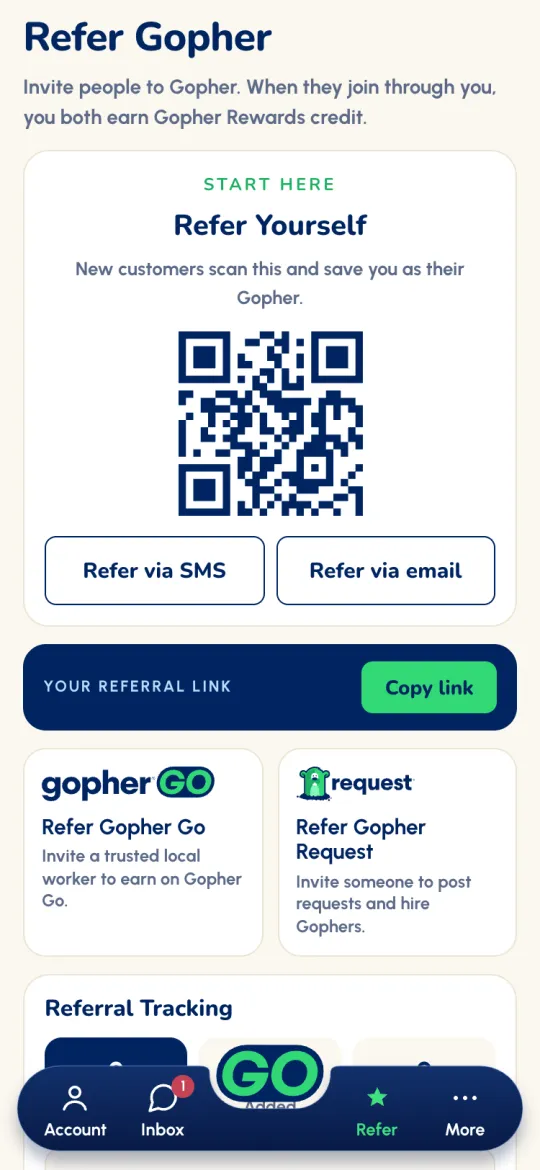
- Refer Yourself. Your QR code: new customers scan it and save you as their Gopher. Tap it to show it bigger. Your referral link is the same thing as a link; tap Copy link to paste it anywhere. Or tap Refer via SMS or Refer via email to send it.
- Refer Gopher Go invites a trusted local worker to earn on Gopher Go. Refer Gopher Request invites someone to post requests and hire workers. Type their numbers or emails, or tap Choose from my contacts, then send. On Android, if your phone doesn’t share the contact you pick, Gopher says so: tap Type their number (or Type their email) and type it in. After that, Choose from my contacts no longer shows on that phone.
- Referral Tracking shows who you've invited: Pending (invited), Added (signed up) and Active (completed their first job), newest first in each tab.
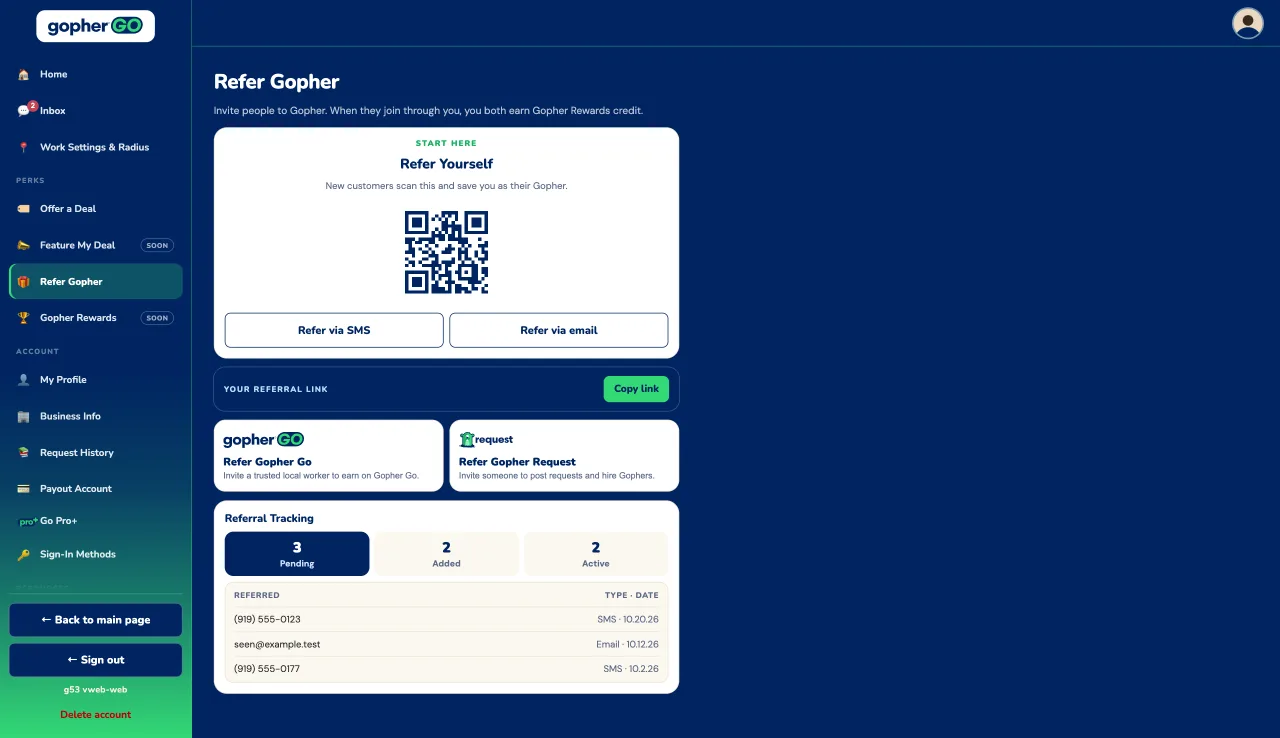
Refer Gopher is in the menu under Perks. From the top of the page:
- Refer Yourself, the Start here card: your QR code. New customers scan it to save you as their Gopher. Click it to show it bigger. Refer via SMS or Refer via email sends it.
- Your referral link: the same as your QR code, as a link. Copy link copies it.
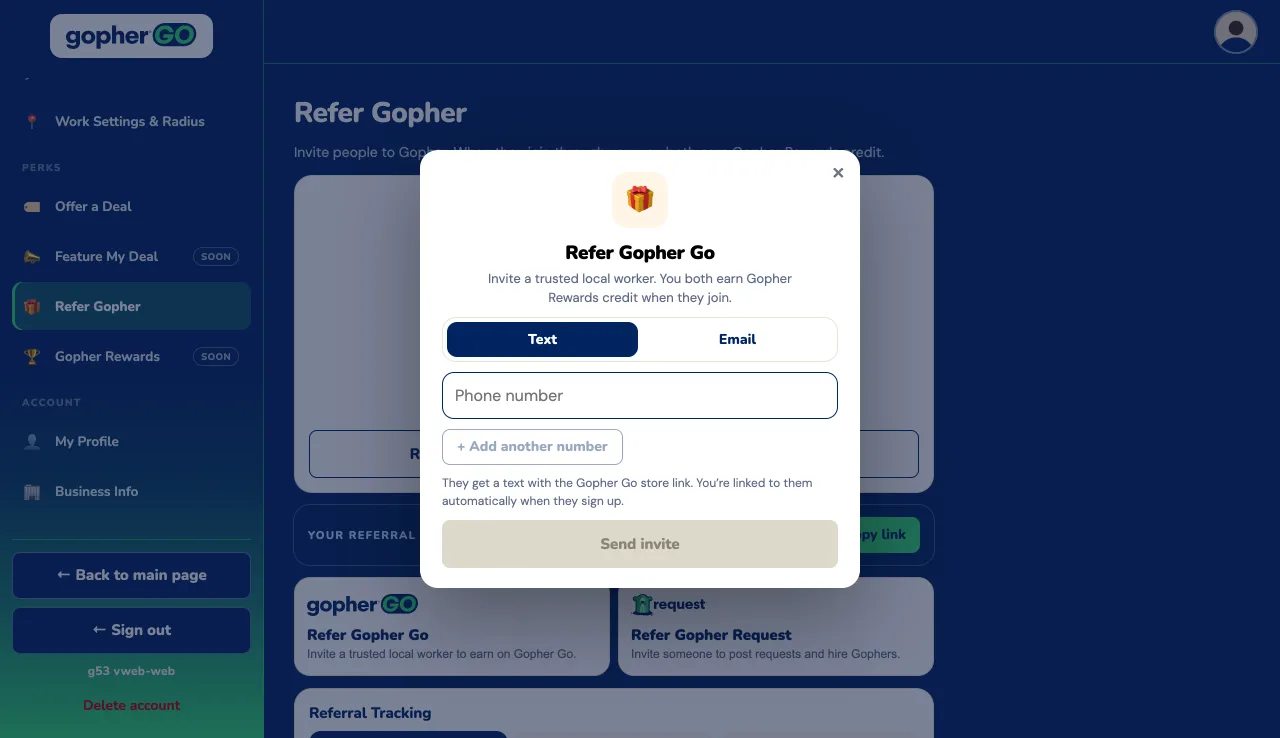
- Refer Gopher Go and Refer Gopher Request, two cards with their logos: choose Text or Email, enter a number or email (+ Add another number for more), then click Send invite.
- Referral Tracking, in its own card: who you’ve invited, under Pending, Added and Active. Each tab shows how many, and each row shows the person, then the details and the date.
Service Provider Deal & Feature My Deal
Offer a Deal, under Perks in the menu, puts your own deal in front of Gopher users nearby. It unlocks automatically once you have all four:
- a verified tier (Gopher Pro or Gopher Pro+);
- 20 or more completed service jobs;
- a 4.75★ average over your last 20 service jobs;
- a profile photo or business logo on your account.
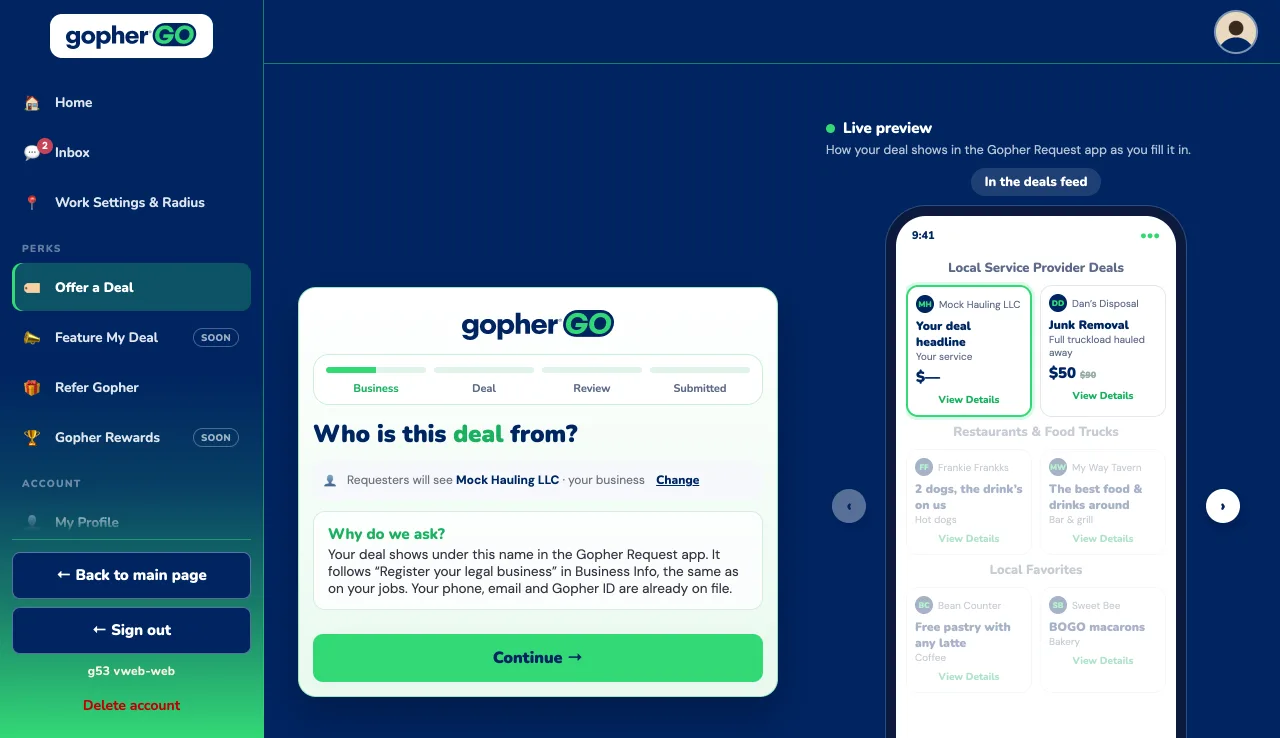
Delivery and Ride Sharing jobs don't count toward the jobs or the average. Other jobs do, unless they’re really a delivery or a ride. Offer a Deal opens its own page: a card on the left and a Live preview phone on the right. Until you qualify, the card says Unlock Service Provider Deals and shows each mark, ticked or with your own number, then See the eligibility terms →.
Once you qualify, the card takes you through four steps, Business · Deal · Review · Submitted, one question at a time, each with a Why do we ask? box and Continue or Back. As you fill it in, the preview phone shows your deal the way requesters will see it in the Gopher Request app. It asks for:
- What service is this for?;
- Deal you're offering;
- 1 to 3 searchable keywords;
- What do you want to earn?: the amount paid to you when the job's done;
- What would you normally charge?: shown struck through on your deal (the requester pays 10% more than what you earn);
- how far it reaches: Neighbors within, up to 50 miles.
The first step, Who is this deal from?, shows the name Requesters will see: your business name, or your name if you're not a registered business. Change takes you to Business Info.
On Review, check everything and click Submit my deal →. You’ll see Deal submitted for review; click Done. Each deal is reviewed before it goes live, and we message your Gopher Go inbox when it does.
Feature My Deal, under Perks, is where you bid to feature your live Service Provider Deal along with all 4 other featured categories for a month (viewed 1st by all app and web Gopher users). Bidding closes on the 20th, and the top bid in each category goes live on the 1st.
Cancelling & good standing
A few habits keep your account healthy and your earnings flowing.
If you have to back out of a job
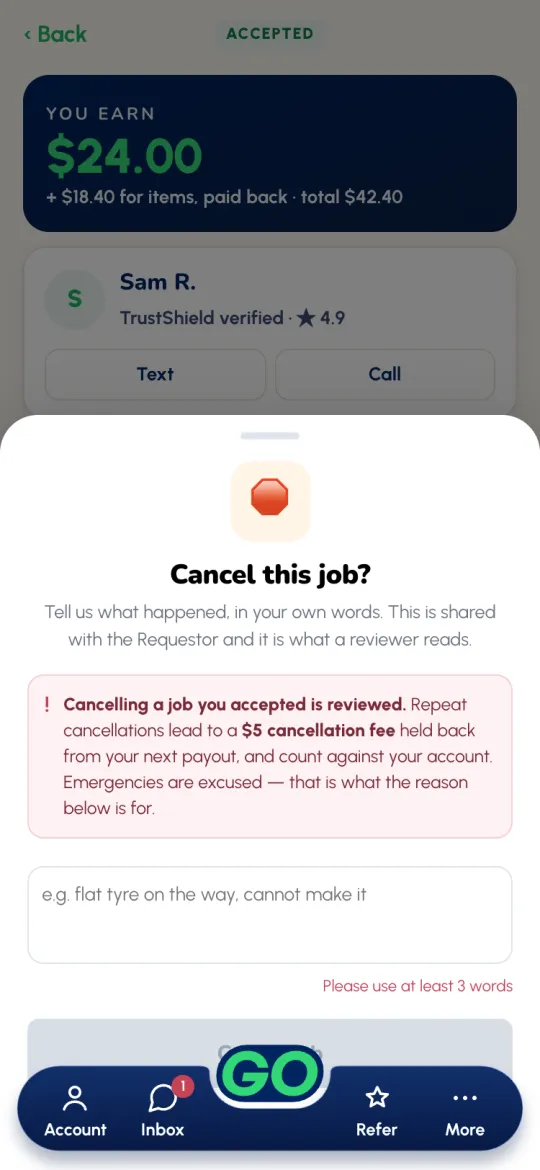
- Cancel it, with a reason. On the job screen, tap Cancel job. Tell us what happened in your own words (at least 3 words). Your reason is shared with the customer, and it's what a reviewer reads. Then tap Cancel job, or Keep this job if you change your mind.
- The customer decides what's next. We tell them right away, and they choose whether to send the job to another worker or cancel it. You won't see it again.
- It's reviewed. Cancelling after you accept is reviewed. Repeated unexcused cancellations can carry a fee of up to $5 and can lead to removal. Emergencies are excused; that's what the reason is for.
- Support can take you off a job. If a job needs to go back out and you can't act, support can do it. You'll get a notification, You were removed from a request, if that happens.
Avoid these cancellation reasons
- "Too far": the distance is shown before you accept. Check it.
- "Not enough money": the pay is clear from the start.
- "Didn't mean to accept": that's a lot of checkboxes to tick by accident.
- "Wasn't clear what to do": tap Question? before you accept.
Do this every time
- Update the job in real time, at the right location. Tap In progress when you really start, and before you spend anything.
- Complete jobs promptly and professionally. Need ASAP jobs should be done within an hour unless you agree otherwise; food deliveries closer to 30 minutes.
- Be courteous, always.
Safety & the rules
- Truly independent. You're not a Gopher employee: you work for the customer. We just make sure they pay you on time.
- Keep messages in the app. Before you're hired, don't share phone numbers, emails or other contact details; the app hides them. Once you're hired, you can call or text your customer. Paying, or arranging to pay, outside Gopher is never allowed, before or after you're hired.
- The app checks your messages before they send. If a message breaks these rules, the app asks you to remove the details. If you send it anyway, it's flagged, and the conversation is blocked while our team reviews it.
- Only take what you can do well. Don't accept jobs outside your skills or your age eligibility.
Help & your account
You're ready to earn! For anything else:
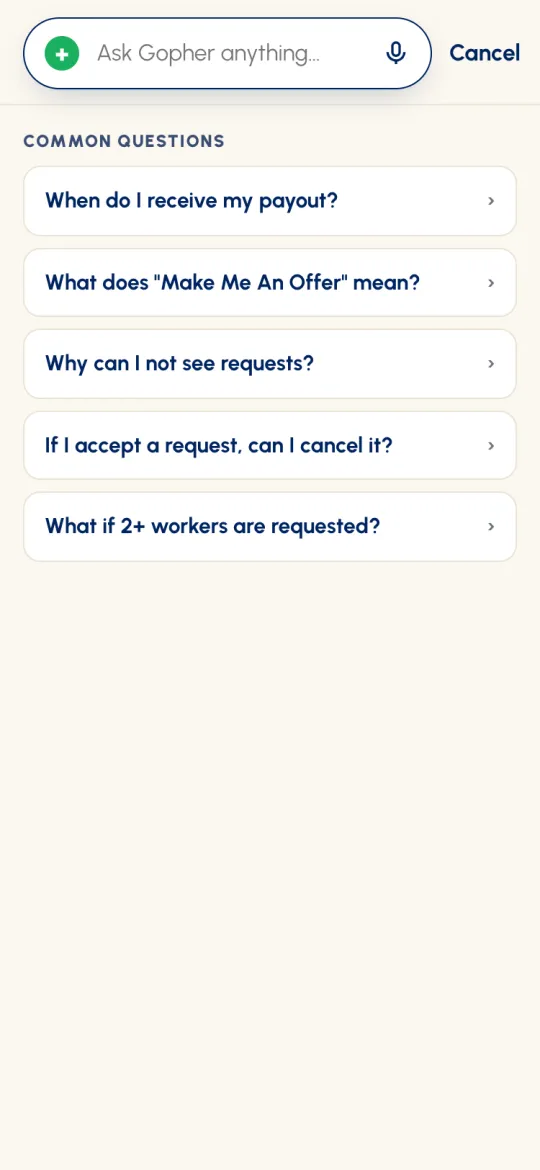
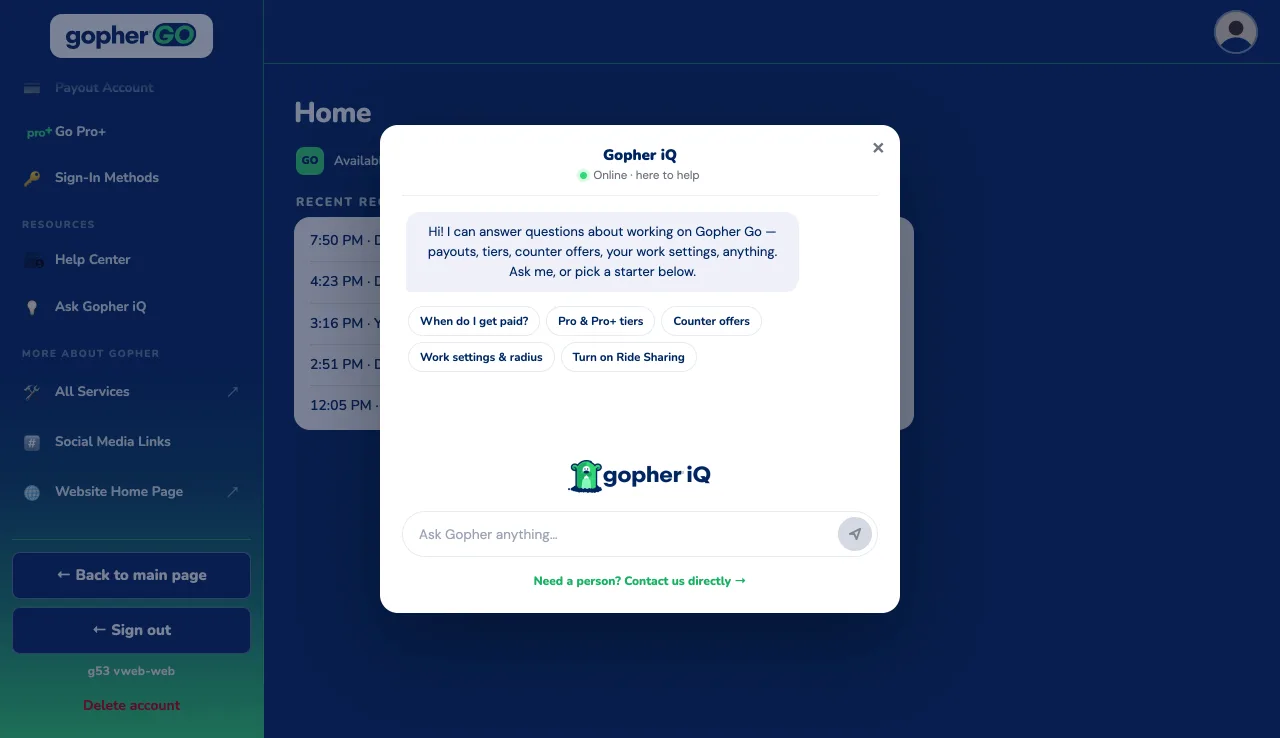
- Ask Gopher iQ. On Home, tap Ask Gopher anything…. You'll see common questions, and answers appear as you type. You can also use your keyboard's microphone to say it. Didn't find it? Tap Open the Help Center →.
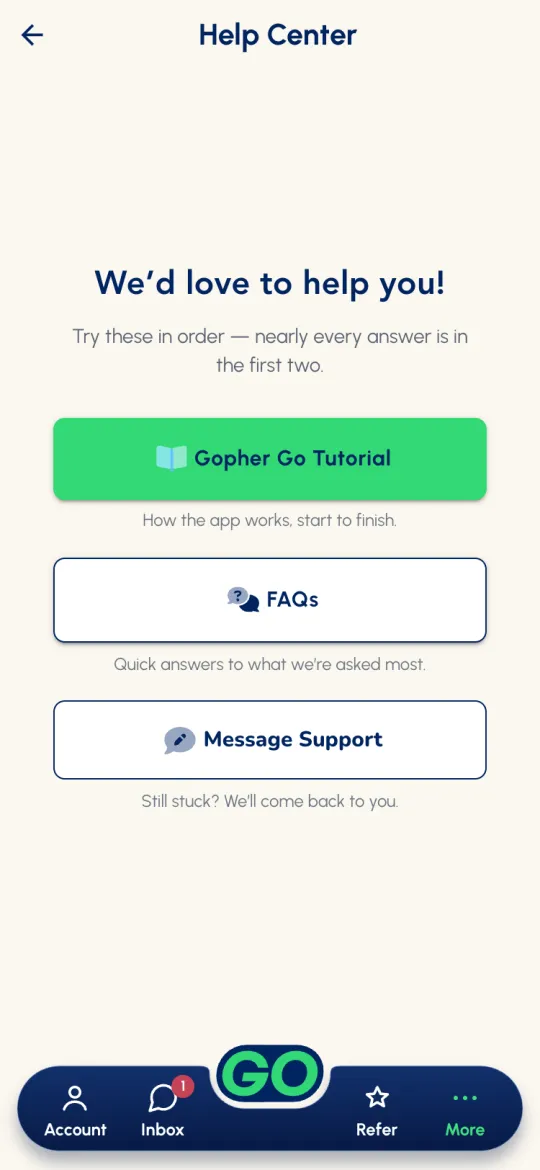
- More → Help Center has three buttons: Gopher Go Tutorial, FAQs, and Message Support to chat with our team.
- Email us at support@gophergo.io.
Your account
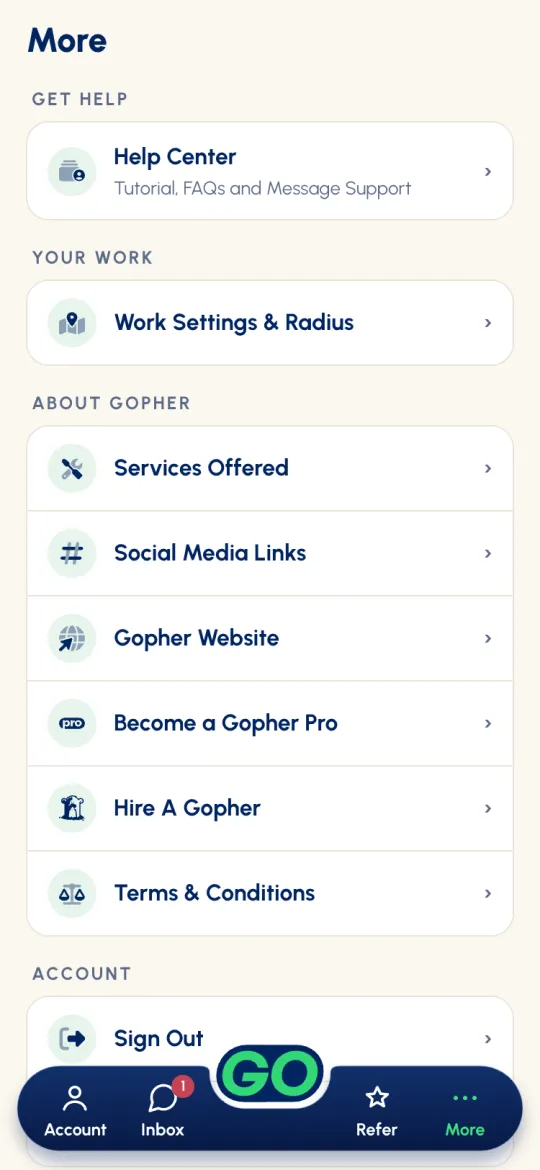
At the bottom of More, under Account, is Sign Out, with the red Delete account link under it. Deleting your account is permanent and happens straight away: it erases your history. If you just need a break, sign out instead.
Now get in the game — go Gopher it!
For anything else, use Resources in the menu:
- Need help? In the menu, under Resources, choose Help Center. Try these in order: Gopher Go Tutorial opens this guide. FAQs opens our frequently asked questions in a new tab. Message Support opens our Contact Us page. Fill in your name, email and message, then Submit opens your email app with a message to support@gophergo.io, ready to send. ← Back to dashboard brings you back.
- Ask Gopher iQ opens Gopher iQ: ask a question or pick a starter. Need a person? Contact us directly → opens Talk to a person, with Email support. Send product feedback there opens the same Contact Us page.
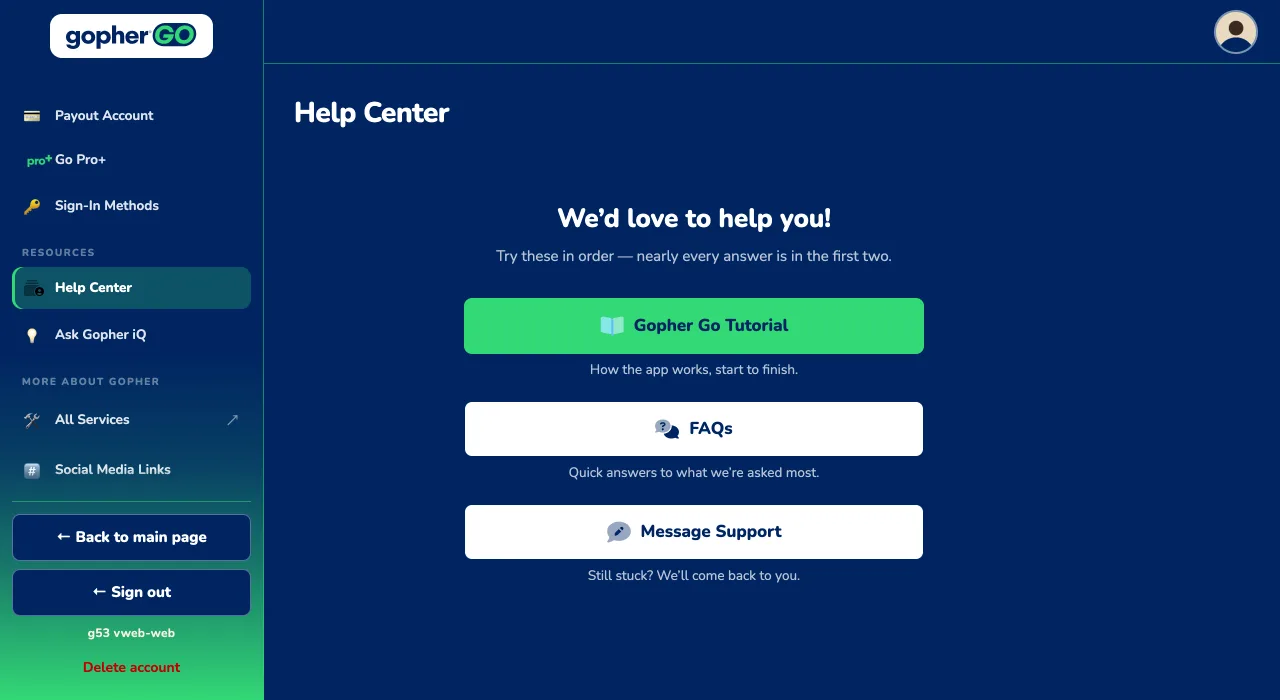
← Back to main page leaves the dashboard for the Gopher Go page, with the Welcome back bar under the header, and keeps you signed in. ← Sign out signs you out on this browser.
You can also email us at support@gophergo.io.
Your account
Delete your account. At the very bottom of the menu, under ← Sign out and the version line, click the red Delete account link. Read the note: deleting your account also erases your transaction history and corresponding rewards. Click Delete account to delete it for good; you'll be signed out. If you have a live request, you'll see Accounts cannot be deleted during a live request. instead, and nothing is deleted. Once the request has been either cancelled or completed, you can delete your account. To keep your account, click Back. To tell us how we can do better, click Contact us. It opens our Contact Us page in a new tab.